L1: Introduction to Large Language Models (LLMs)
An LLM is a deep neural network designed to understand, generate, and respond to human-like text.
What it replaced: Before LLMs, traditional NLP (Natural Language Processing) models were good at specific, narrow tasks like spam classification. They failed at complex tasks like writing a coherent email from a list of keywords-something LLMs find trivial.
Why "Large"? The "large" refers to two things:
- Massive Datasets: They are trained on vast quantities of text, sometimes large portions of the entire internet (billions of words).
- Massive Models: The models themselves are huge, with tens or even hundreds of billions of parameters. Parameters are the internal "weights" or "knobs" the model adjusts during training to make better predictions.
How LLMs are Built
This is one of the most critical concepts in your lecture. Building an LLM is a two-step process: Pretraining and Fine-Tuning.
Stage 1: Pretraining (Creating the "Foundation Model")
This stage is about building general knowledge.
- The Goal: To create a "foundation model" (or base model). This is a model with a broad understanding of language, context, and facts.
- The Data: Massive amounts of unlabeled, "raw" text (e.g., the internet, books, Wikipedia).
- The Task: The model is not taught to answer questions. It's trained on a very simple task: next-word prediction. The model reads a sentence and simply tries to predict the next word.
- The Method: This is called self-supervised learning. We don't need humans to label the data because the data is the label. In the sentence "Breakfast is the most important...", the label for "important" is simply "meal".
- The Result: A powerful foundation model (like GPT-3) that is good at text completion but is not yet a helpful assistant.
- The Cost: This stage is extremely expensive, costing millions of dollars in computing power.
Stage 2: Fine-Tuning (Creating the "Specialized Model") This stage is about shaping the model for a specific purpose.
- The Goal: To adapt the foundation model for a specific, useful task.
- The Data: A much smaller, labeled dataset that is specific to the task.
- The Tasks (Two Main Types):
- Instruction Fine-Tuning: This is how you make a chatbot. The model is trained on a dataset of instructions and high-quality answers (e.g., questions and answers, translation requests, summarization examples). This teaches it to be a helpful "personal assistant".
- Classification Fine-Tuning: This is how you make a specialized tool. The model is trained on texts with class labels (e.g., thousands of emails labeled "spam" or "not spam")
Transformer Architecture
Key Invention: Self-Attention: This is the Transformer's "magic trick". It's a mechanism that allows the model to look at all the words in a sentence at once and weigh the importance of different words relative to each other. This is how it understands context (e.g., knowing that in "The cat sat on the mat," the word "sat" is highly related to "cat" and "mat")
Transformer was built for translation and had two parts:
- Encoder: This is the part that looks at the input sentence creates numerical representations and captures the contextual information.
- Decoder: This is the part that looks at the context vector and produces one word at a time.
Self-Attention Mechanism
- Key innovation of transformers
- Allows model to weigh importance of different words relative to each other
- Enables capturing long-range dependencies in text
- Helps generate coherent, contextually relevant output
Model Types
Modern LLMs adapted the original Transformer architecture in two different directions.
- Encoder-Only Models: These models only have an encoder. They are used for tasks like text generation, summarization, and translation.
- Decoder-Only Models: These models only have a decoder. They are used for tasks like language translation and text classification.
- Encoder-Decoder Models: These models have both an encoder and a decoder. They are used for tasks like text generation and summarization.
BERT VS GPT
BERT (Bidirectional Encoder Representations from Transformers)
-
Architecture: Encoder-only
-
Training Task: Masked word prediction
The model predicts hidden/masked words in sentences.
Example:
"This is an __ of how concise I __ be"→ fills in missing words. -
Best For:
- Text classification
- Sentiment analysis
- Document categorization
Example: X (Twitter) uses BERT for toxic content detection.
-
Key Feature:
Bidirectional - considers context from both sides of a word in the sentence.
GPT (Generative Pre-trained Transformer)
-
Architecture: Decoder-only (simpler than full transformer)
-
Training Task: Next-word prediction
The model predicts the next word in a sequence.
Example:
"The model is simply trained to predict the next ___"→ predicts "word". -
Best For:
- Text generation
- Writing stories, articles, code
- Machine translation
- Text summarization
- Question answering
- Following instructions
-
Key Features:
- Unidirectional (processes text left-to-right)
- Autoregressive: uses its own previous outputs as context for future predictions
- Generates text iteratively, one word at a time
Key LLM Capabilities & Terms
These are important terms for describing how LLMs work in practice.
Zero-Shot Learning: The model can perform a task it wasn't fine-tuned for, without seeing any examples. You just give it the instruction.
- Example: Simply telling the model, "Translate English to German: breakfast =>" and it works.
Few-Shot Learning: You give the model just a few examples of a task in the prompt to show it what to do.
- Example: "gaot => goat, sheo => shoe, pohne =>". The model sees the pattern and will output "phone".
Emergent Behavior: This is a major concept. These are abilities that the model was never trained to do, but "emerged" as a side effect of being trained on massive data.
- Key Example: A GPT model (trained only on next-word prediction) discovers how to perform language translation. This was unexpected and shows the power of large-scale training.
Three Stages of Coding an LLM
- Implementing the LLM architecture and data preparation process (stage 1)
- Pretraining an LLM to create a foundation model (stage 2)
- Fine-tuning the foundation model to become a personal assistant or text classifier (stage 3)
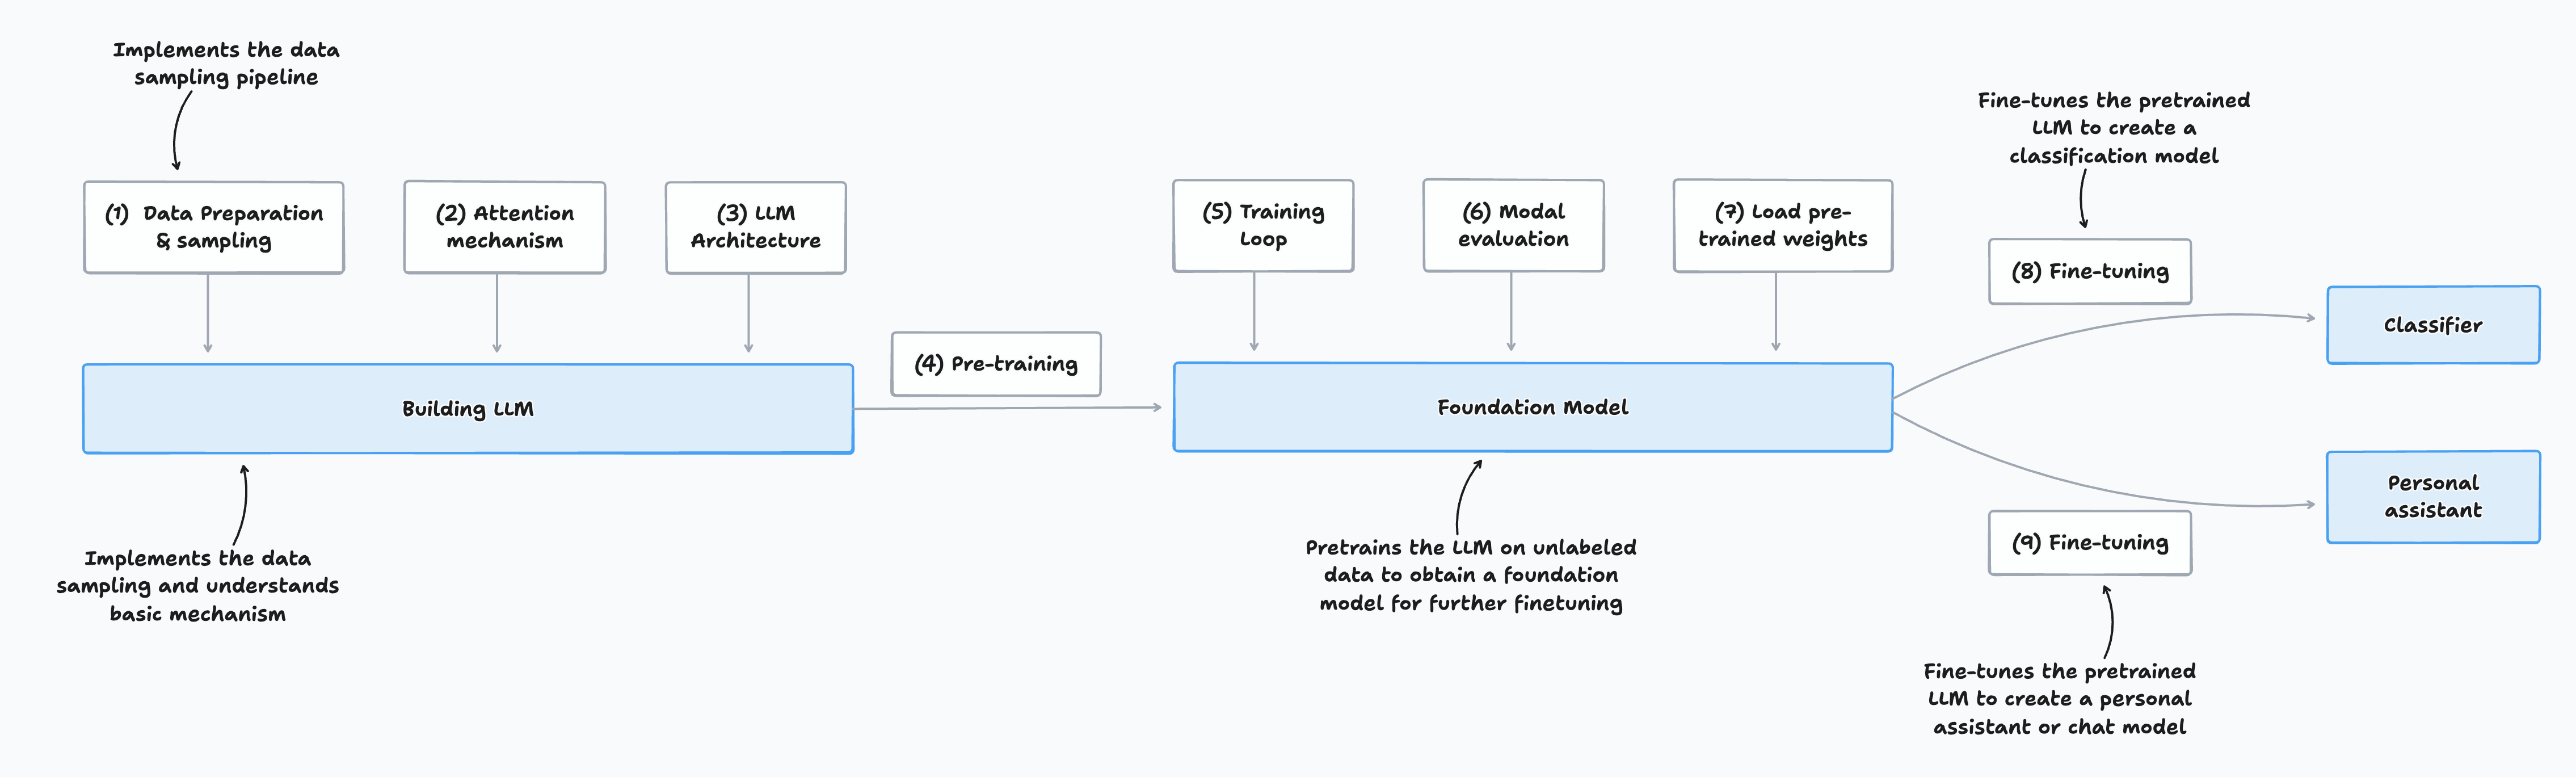
Stage 1: Building an LLM
Stage 1 involves assembling the fundamental components that make up a Large Language Model (LLM). The structured steps are:
1. Data Preparation & Sampling
- Preprocess input text: Clean and format raw textual data for use in model training.
- Create training samples: Organize the prepared data into examples that the model will learn from.
2. Attention Mechanism
- Implement self-attention: Enable the model to focus selectively on different parts of the input, understanding the context and the relationships between words.
3. LLM Architecture
- Design the model structure: Build the neural architecture that will process and generate language.
- Code the decoder: Develop the sequence generation component that outputs predictions.
4. Pretraining
- Train on unlabeled data: Use large volumes of raw text to expose the model to patterns in language without explicit supervision.
Output of Stage 1:
A basic LLM that is able to process textual data, leverage self-attention for context, and generate outputs based on what it has learned from pretraining. This model forms the groundwork for further fine-tuning and specialization in later stages.
Stage 2: Pretraining the Foundation Model
Stage 2 is about transforming the initial LLM into a powerful, general-purpose foundation model by exposing it to large-scale, unsupervised training. The major steps are:
5. Training Loop
- Iterative learning process: Train the model over multiple epochs, continually updating its parameters based on the observed data.
6. Model Evaluation
- Assess performance: Periodically evaluate the model on validation sets to monitor learning progress and prevent overfitting.
7. Load Pretrained Weights (if applicable)
- Use existing trained models: Optionally initialize your model with weights from previous pretraining to accelerate convergence or improve performance.
Output of Stage 2:
A pretrained foundation model, ready to be fine-tuned for specific tasks and applications.
Stage 3: Fine-Tuning for Specialized Models
At this stage, the pretrained foundation model can be adapted for specific downstream use cases. There are two common fine-tuning paths:
Path A: Text Classification
- Fine-tuning for Classification
- Dataset: Labeled texts (input texts with class labels)
- Goal: Train the model to accurately classify new texts into predefined categories.
- Output: A specialized classification model.
Path B: Instruction-Following (Personal Assistant)
- Fine-tuning for Instruction-Following
- Dataset: Instruction-answer pairs (inputs are instructions, outputs are desired responses)
- Goal: Enable the model to generate helpful, context-aware responses to various instructions.
- Output: A chat model or personal assistant.
L2: Working with text data
Preparing Text for LLM Training
Before training a large language model (LLM), the text data must be preprocessed and prepared in several key steps:
-
Tokenization
- Word and Subword Tokens: Break down the text into individual word tokens or, more commonly for LLMs, into subword tokens for better handling of rare or unknown words.
- Byte Pair Encoding (BPE): An advanced tokenization technique that identifies the most frequent pair of bytes in the text and merges them, allowing the model to deal efficiently with out-of-vocabulary words.
-
Generating Training Examples
- Sliding Window Approach: Divide the tokenized text into overlapping segments (windows) to create training samples that maximize data coverage and context.
-
Vectorization
- Convert each token into a numerical vector (embedding), which serves as the input for the neural network.
Recap: Structure & Training of LLMs
- Large Language Models (LLMs) are neural architectures designed to process language using massive volumes of pretraining data.
- The most common modern LLMs are decoder-only transformers (like those in ChatGPT), which specialize in generating text by predicting words one at a time.
- During pretraining, LLMs read sequences of tokens and learn to predict the next token in the sequence, gradually capturing grammar, facts, and patterns from the data.
Training Workflow for LLMs
- Scale: LLMs are trained with datasets containing millions to billions of tokens and have millions or even billions of parameters.
- Pretraining Task: The primary training objective is next-word (token) prediction, enabling the model to develop strong general-purpose language capabilities.
- Fine-Tuning: After pretraining, LLMs are further fine-tuned on targeted datasets to refine their abilities for specific instructions or tasks.
- Preparation: Effective training requires careful preparation of the dataset and data pipeline, as outlined above and summarized in the figure Stages Of Coding An LLM.
Preparing Input Text for LLM Training
Before an LLM can be trained, the input text must undergo several preprocessing steps:
-
Tokenization
- Word and Subword Tokens: The text is split into individual word or subword tokens. Subword tokenization helps handle rare or unknown words more effectively.
- Byte Pair Encoding (BPE): An advanced tokenization method used in models like GPT, which merges the most frequent pairs of bytes to efficiently represent words and subwords.
-
Vectorization (Embeddings)
- Tokens are encoded as vector representations (embeddings) which can be processed by the neural network.
-
Sampling and Data Loading
- Input-output pairs are generated for training using strategies such as sliding windows or sampling to maximize coverage and dataset quality.
Understanding Word Embeddings
- Neural networks, including LLMs, cannot process raw text directly because text data is categorical and incompatible with the mathematical computations of neural networks.
- To solve this, words and tokens are converted into continuous-valued vectors, known as embeddings.
- Embeddings allow the model to represent text data numerically, enabling the neural network to discover relationships and patterns during training.
Embedding
Deep learning models are unable to process raw data types-such as video, audio, and text-directly, because these formats are incompatible with the mathematical operations used in neural networks. To address this, raw data is transformed into dense, numerical vector representations called embeddings.
Key Points about Embeddings
-
What is an Embedding?
- An embedding is a mapping of raw input data (text, audio, video, etc.) into a continuous, high-dimensional vector space using a neural network or a specific neural network layer.
- These vectors capture the essential features and relationships present in the original data, making it suitable for deep learning models to process.
-
Modality-Specific Embeddings
- Different data formats require specialized embedding models:
- Text: Use models like word2vec, BERT, or transformer-based encoders.
- Audio: Use audio-specific encoders (e.g., spectrogram-based models).
- Video: Use temporal and spatial feature extractors.
- An embedding model trained for one data type (such as text) is not appropriate for other modalities (like audio or video).
- Different data formats require specialized embedding models:
In summary: Embedding models transform different types of raw data into dense vector formats, bridging the gap between unstructured input and neural network processing. The choice of embedding model depends on the data type to ensure relevant features are captured.
Purpose and Types of Embeddings
At their core, embeddings provide a way to map discrete objects-such as words, images, or entire documents-into points in a continuous vector space. The main goal is to transform non-numeric data into numerical formats that neural networks can process effectively.
- Word Embeddings: The most common type, representing individual words as vectors.
- Sentence, Paragraph, and Document Embeddings: Embeddings can also represent larger units of text, such as sentences, paragraphs, or entire documents. These richer representations are especially useful for certain advanced tasks.
Note: Sentence or paragraph embeddings are often used in retrieval-augmented generation, a technique that combines language model generation with external information retrieval.
Retrieval-Augmented Generation (RAG) and Embeddings
Retrieval-Augmented Generation (RAG) enhances text generation by allowing models to retrieve relevant information from external sources (like a database or document corpus) and incorporate it into the generated output.
- RAG works by searching for and retrieving relevant knowledge before or during generation, grounding responses in up-to-date or specific facts.
- While RAG is a valuable technique, its implementation details are beyond the scope of this class.
Focus for This Class:
Since we are concentrating on training GPT-like LLMs-which generate text one word at a time-our primary concern is with word embeddings rather than sentence or paragraph embeddings.
Algorithms for Word Embeddings
Several algorithms and frameworks have been developed to generate word embeddings. One of the earliest and most widely-used methods is Word2Vec.
Word2Vec
- Overview: Word2Vec is a neural network-based model that learns word embeddings by predicting a word's context or, inversely, predicting the target word from its context.
- Key Principle: Words that appear in similar contexts tend to have similar meanings. Word2Vec captures these relationships by analyzing large text corpora.
- Training Approach: The model typically uses one of two strategies:
- Continuous Bag of Words (CBOW): Predicts a word based on its surrounding context.
- Skip-gram: Predicts the context words given a target word.
- Result: After training, words with similar meanings are located close together in the resulting vector space. When these high-dimensional embeddings are projected onto two dimensions for visualization, similar terms cluster together, demonstrating the model's ability to capture semantic relationships.
Word Embedding Dimensions
-
Variable Dimensions:
Word embeddings can have a wide range of dimensions, from just a few up to several thousand. Larger dimensionalities enable the embedding to capture subtler, more complex relationships between words-but come at the cost of increased computational requirements and memory usage. -
Pretrained vs. Learned Embeddings:
Pretrained models like Word2Vec have been widely used to generate embeddings for classical machine learning tasks. However, Large Language Models (LLMs) such as GPT typically learn their own embeddings as part of the input layer during training. These embeddings are continually updated and fine-tuned alongside the model.
Task-Specific Embedding Optimization
- Custom Embeddings for LLMs:
One advantage of training embeddings jointly with the LLM (rather than using static Word2Vec vectors) is that they become customized for the precise dataset and objective at hand, leading to better task performance. - Contextualized Embeddings:
LLMs are also capable of generating contextualized embeddings as output-capturing subtle, dynamic relationships between words and their surrounding context (to be discussed in detail in the next lecture).
High-Dimensional Embeddings: Visualization & Size
- Visualization Challenge:
High-dimensional embeddings (hundreds or thousands of dimensions) are hard to directly visualize, as human perception and most visualizations are limited to 2 or 3 dimensions. Illustrative plots, like figure 2.3, use dimensionality reduction to show embeddings in 2D. - Typical Sizes in LLMs:
In practice, modern LLMs use much higher embedding sizes than those visualized:- GPT-2 (117M and 125M models): Embedding size = 768
- GPT-3 (175B model): Embedding size = 12,288
The specific size depends on the scale and variant of the model, balancing expressivity against resource consumption.
Tokenization: Preparing Text for Embedding
-
Tokenization Overview:
Before generating embeddings, text must be tokenized-split into individual tokens. These tokens may represent words or even finer-grained units, such as subwords, characters, or punctuation.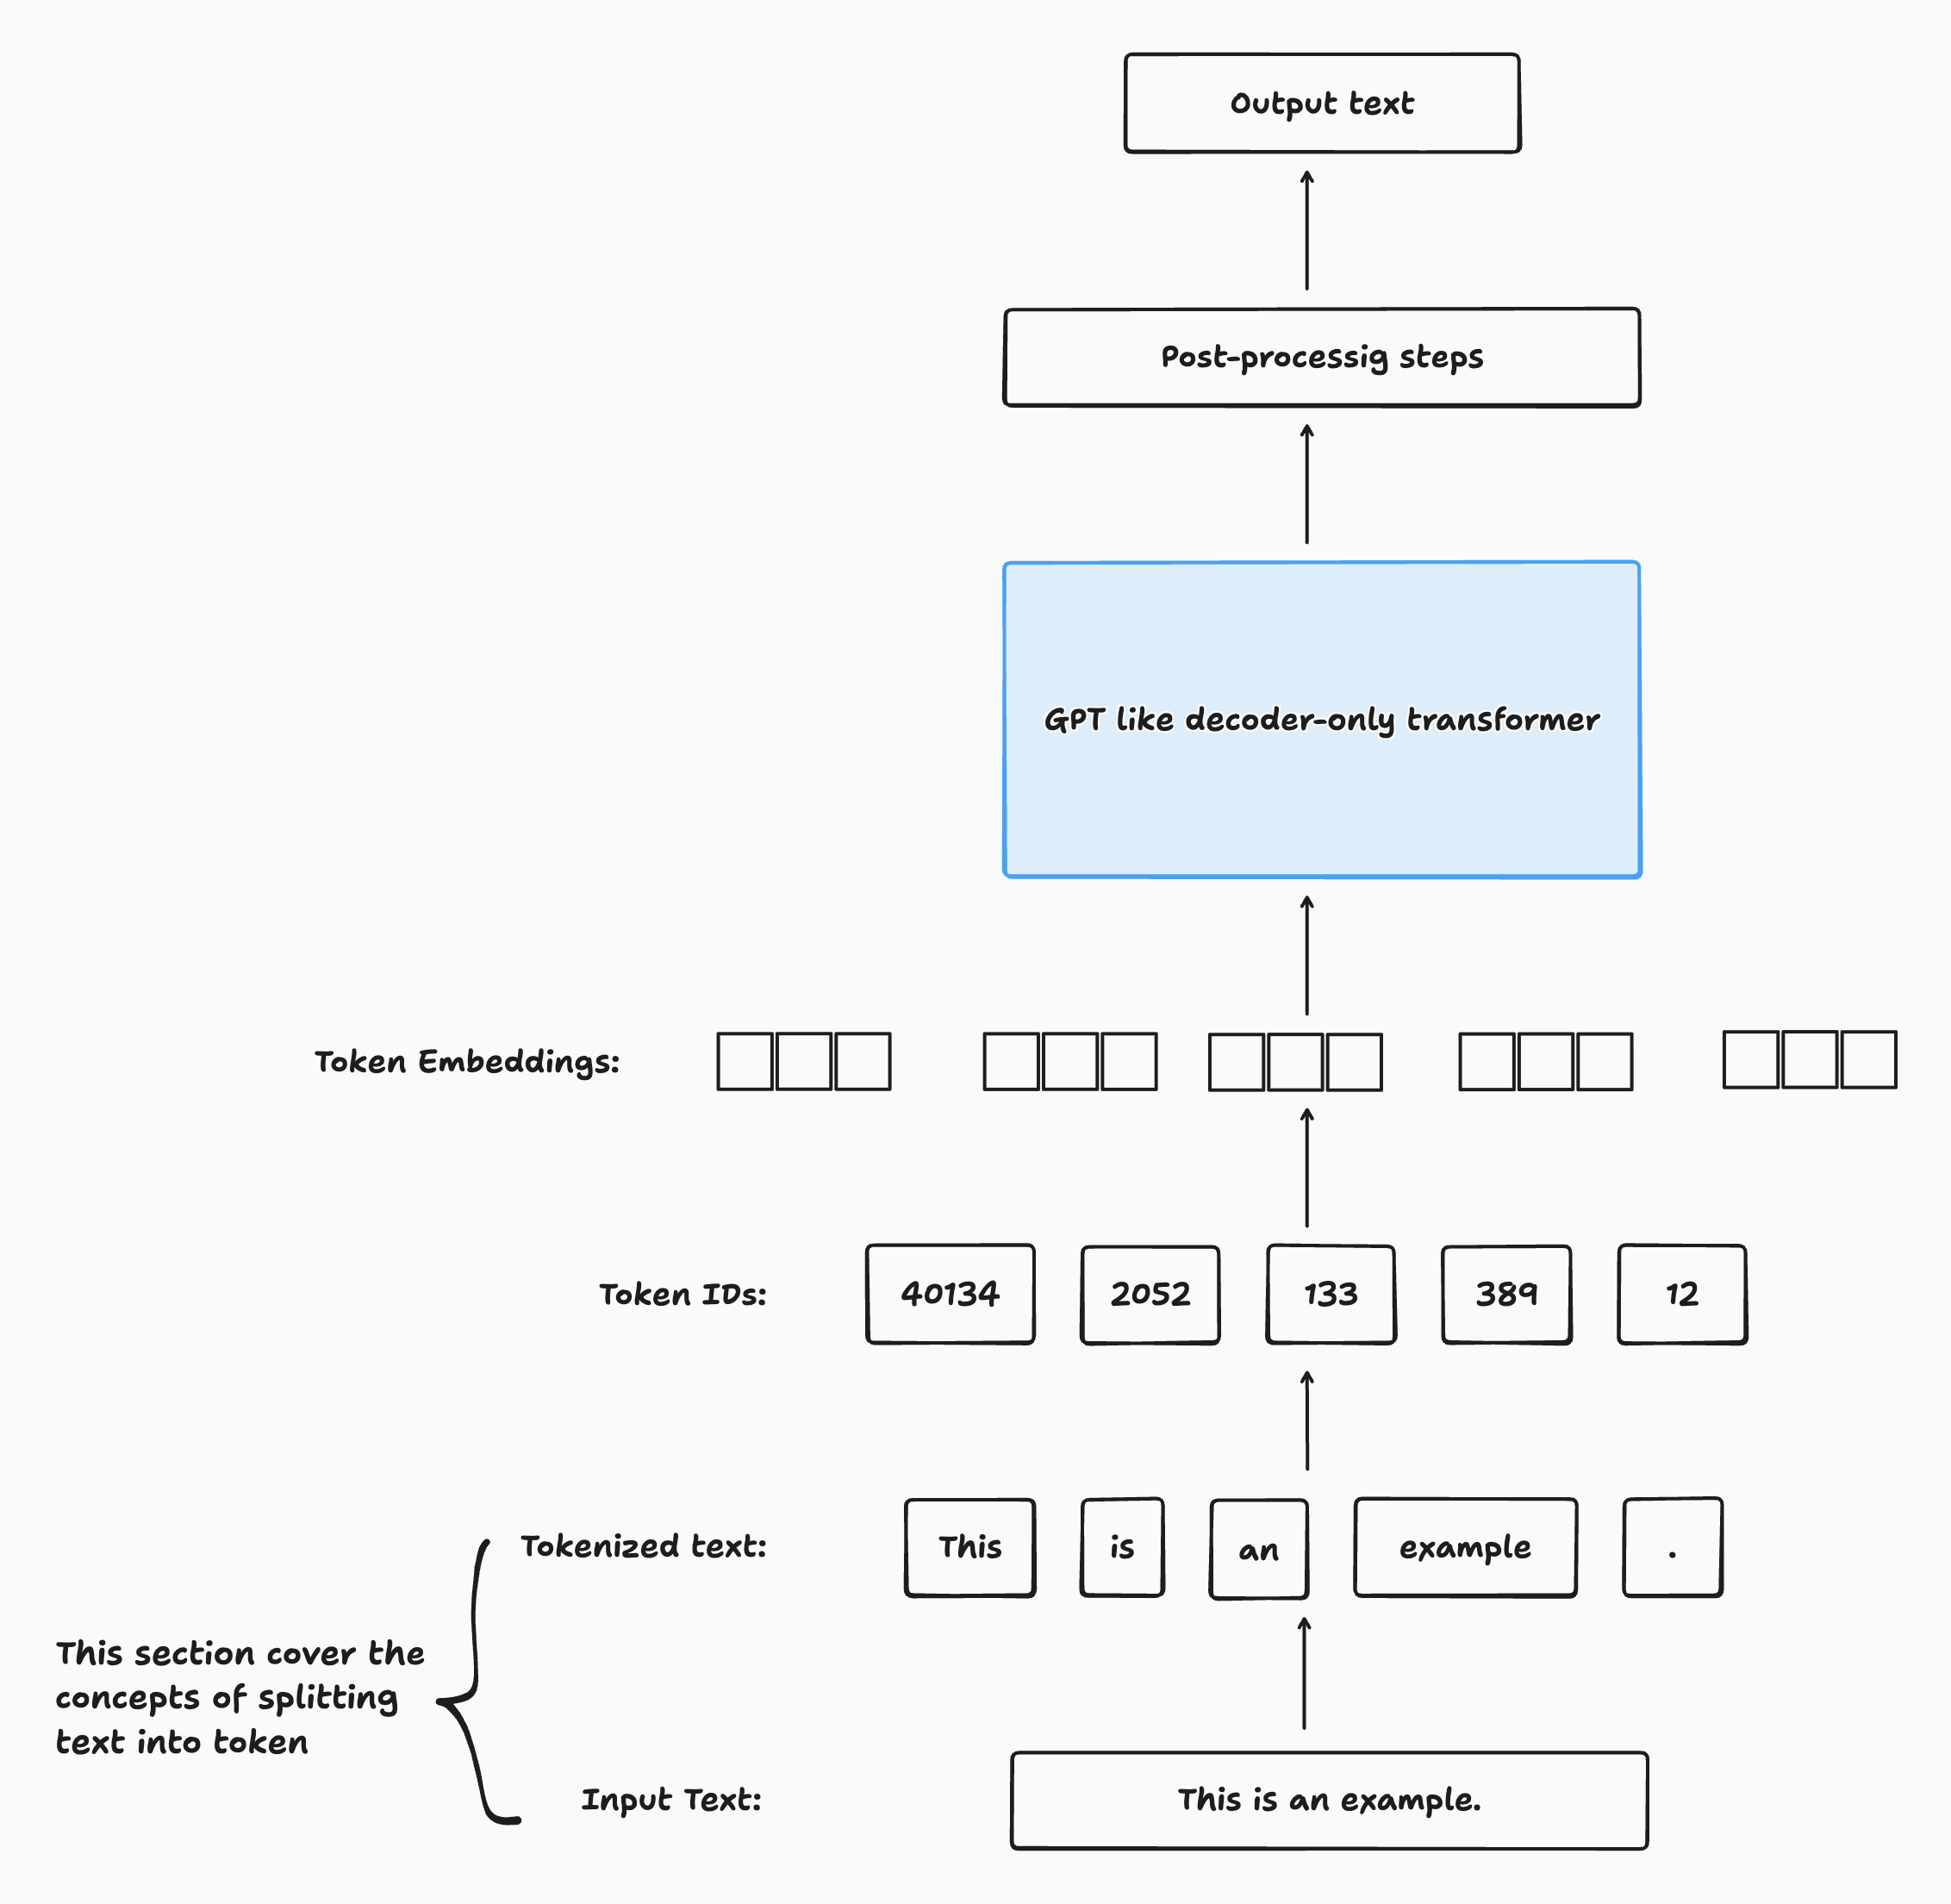
Example: Preparing Training Text
The text used for LLM training in this example is “The Verdict,” a short story by Edith Wharton. Since it is in the public domain, it is freely usable for these experiments. You can obtain the text from:
- Wikisource link-copy-paste into your own file,
the-verdict.txt - Or download
the-verdict.txtfrom the book’s GitHub repository at https://mng.bz/Adng
Reading in a Short Story as a Text Sample
Let's walk through the process of loading and preparing a real-world text example for language model training and tokenization.
1. Loading the Text
We'll use "The Verdict" by Edith Wharton (public domain) as our sample text file.
with open("the-verdict.txt", "r", encoding="utf-8") as f:
    raw_text = f.read()

print("Total number of characters:", len(raw_text))
print(raw_text[:99])
Example output:
Total number of characters: 20479
I HAD always thought Jack Gisburn rather a cheap genius--though a go
The goal is to tokenize this 20,479-character story into individual words and special characters for LLM training.
2. Why Tokenization Matters
- In industry, it's common to process millions of articles and books (gigabytes of text).
- For learning, a single book is sufficient to illustrate main steps and is manageable on consumer hardware.
3. How Can We Split the Text into Tokens?
To extract tokens, we can use Python’s regular expression library re for a flexible splitting strategy.
Simple Example: Splitting on Whitespace
import re
text = "Hello, world. This, is a test."
result = re.split(r'(\s)', text)
print(result)
Output:
['Hello,', ' ', 'world.', ' ', 'This,', ' ', 'is', ' ', 'a', ' ', 'test.']This splits the text into words and individual whitespace, but notice punctuation marks are still attached to words.
4. Improving Tokenization: Splitting on Punctuation
To separate out punctuation (like commas), we can adjust our regex:
result = re.split(r'([,.]|\s)', text)
print(result)
Sample Output:
['Hello', ',', '', ' ', 'world', '.', '', ' ', 'This', ',', '', ' ', 'is', ' ', 'a', ' ', 'test', '.', '']Now words and punctuation are mostly separated, though whitespace tokens remain.
To remove empty tokens and redundant whitespace:
result = [item for item in result if item.strip()]
print(result)
Output:
['Hello', ',', 'world', '.', 'This', ',', 'is', 'a', 'test', '.']5. Should We Keep Whitespace as Separate Tokens?
- Keeping whitespace tokens may be important for some applications (such as source code).
- Removing whitespace reduces memory and is sufficient for most language modeling.
Here, we remove whitespace for simplicity. More advanced tokenizers (used by LLMs) may encode whitespace.
6. Further Improvements: More Punctuation and Special Cases
To tokenize more robustly-including question marks, quotes, and double dashes-use:
text = "Hello, world. Is this-- a test?"
result = re.split(r'([,.:;?_!"()\']|--|\s)', text)
result = [item.strip() for item in result if item.strip()]
print(result)
Output:
['Hello', ',', 'world', '.', 'Is', 'this', '--', 'a', 'test', '?']With this iterative approach, we've developed a simple but fairly flexible way to split text into tokens ready for embedding and LLM training.
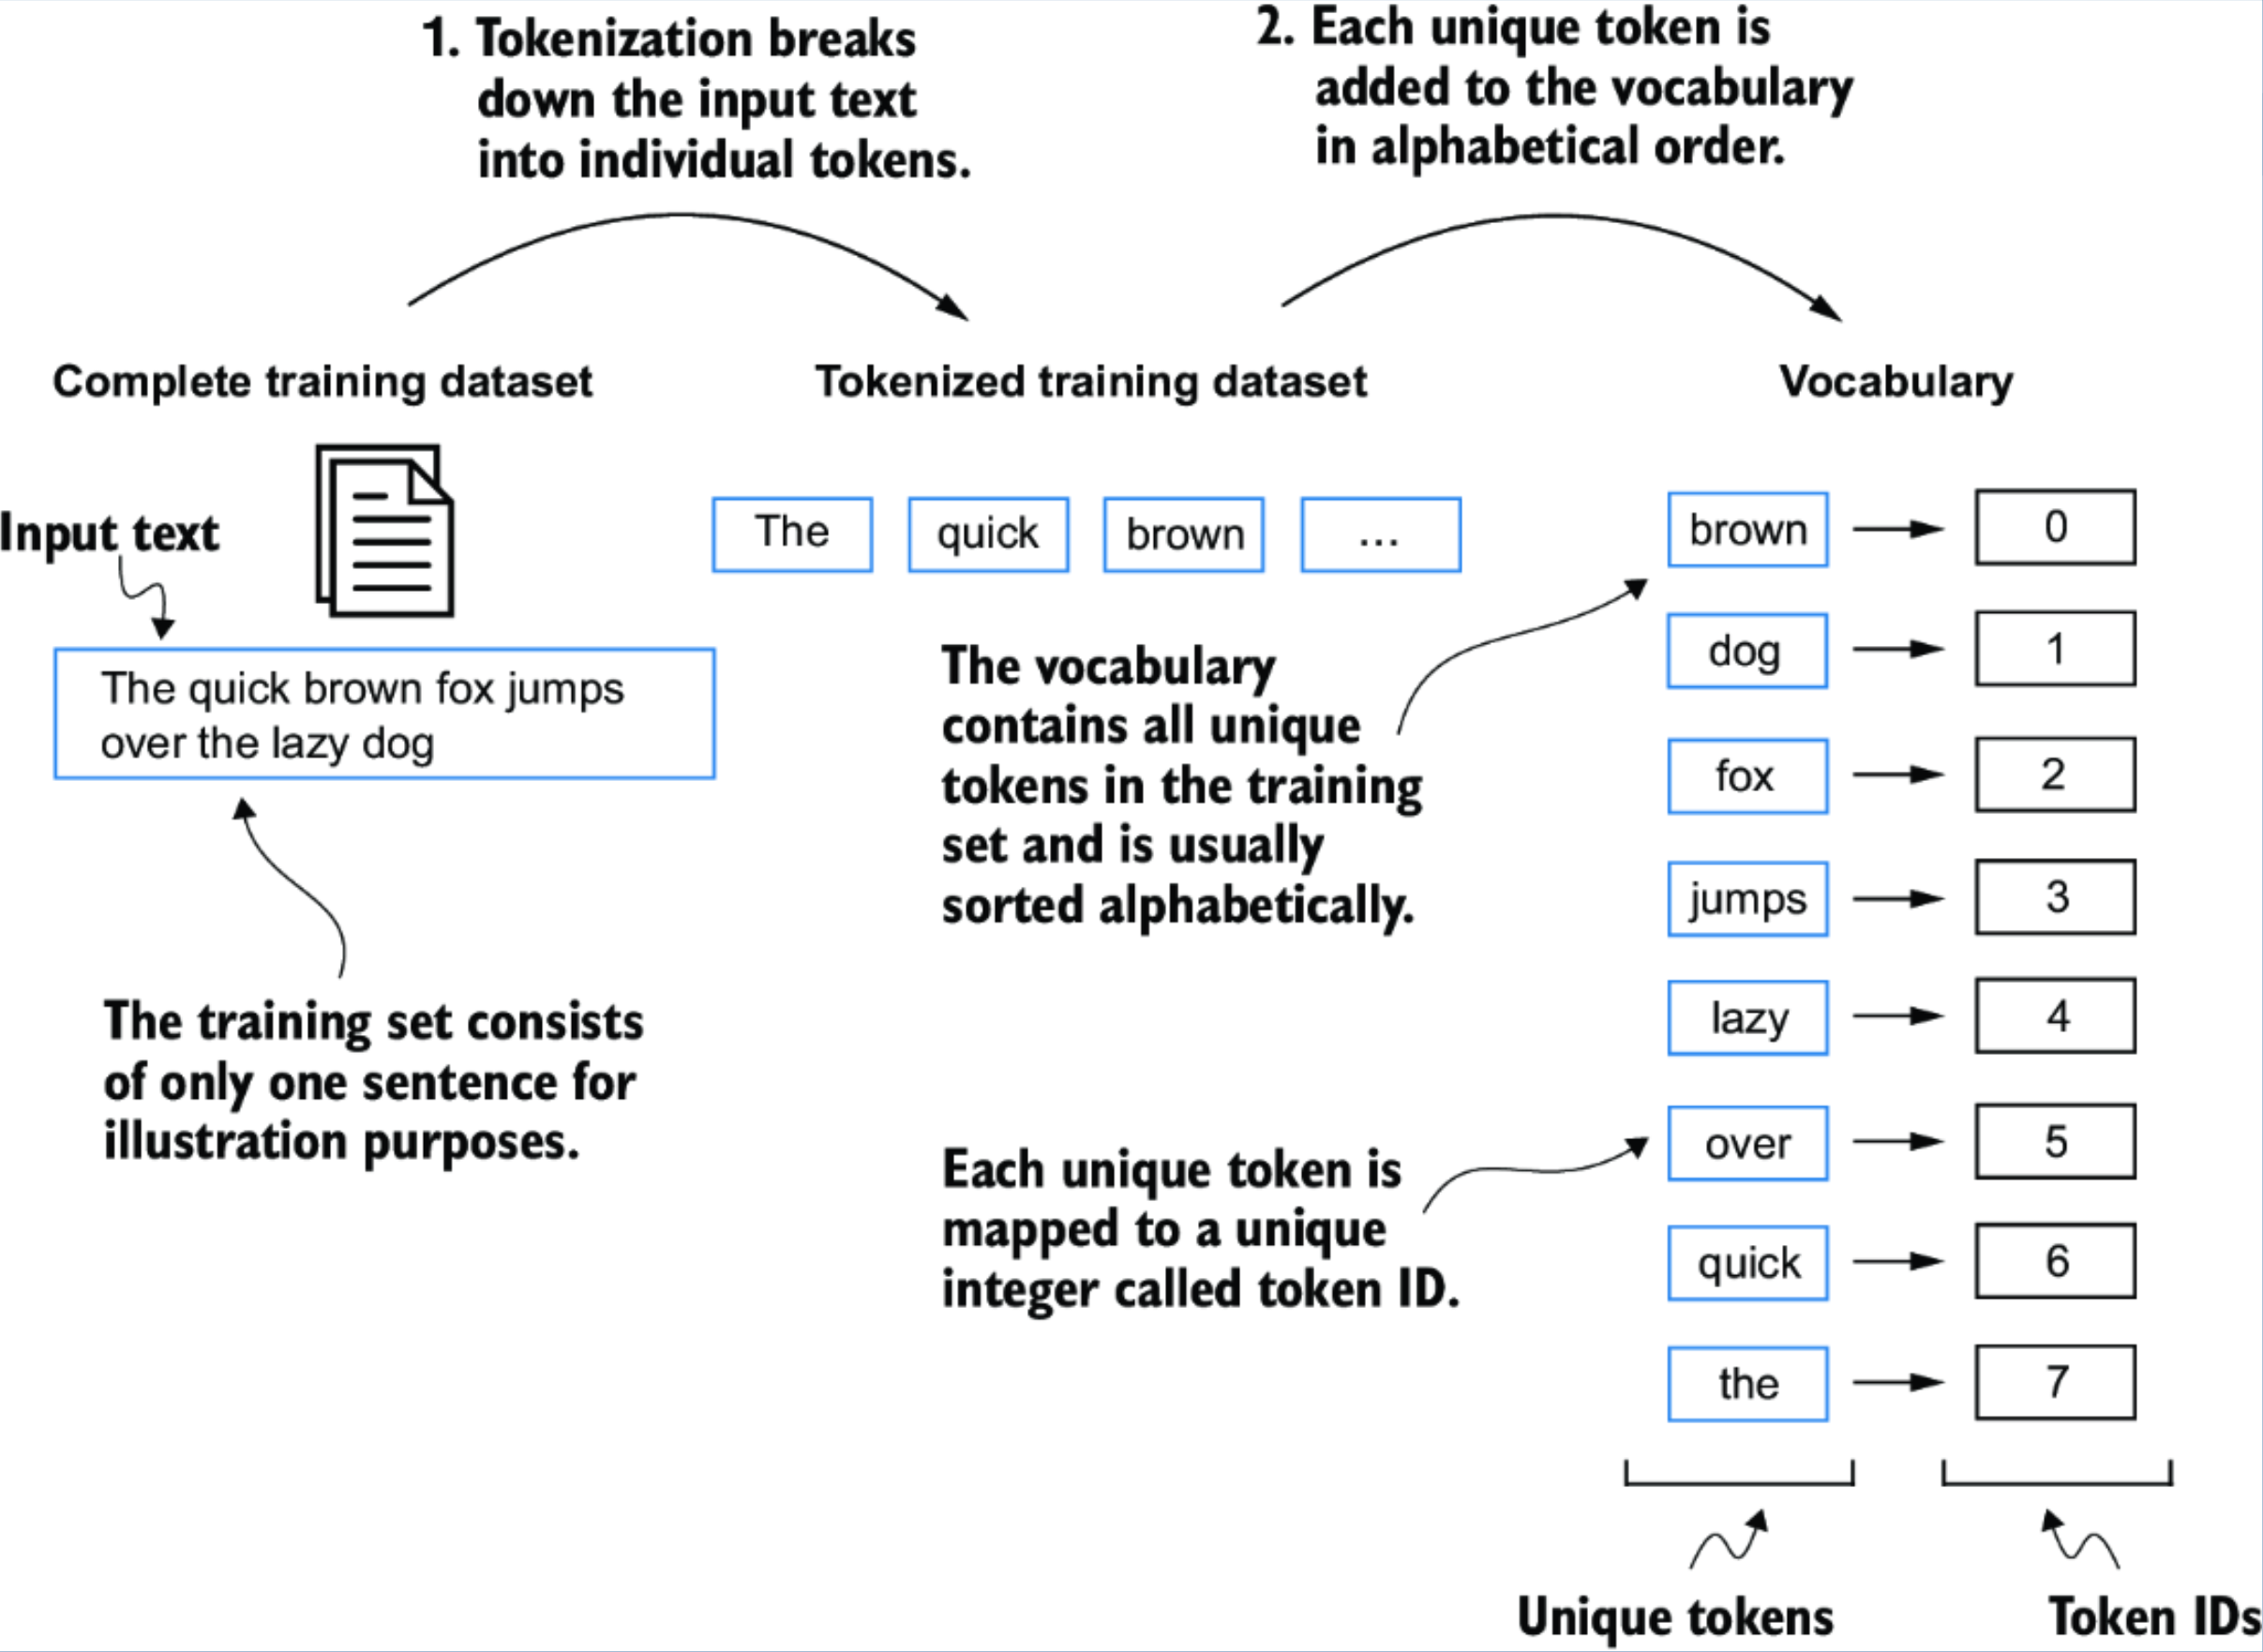
Converting Tokens into Token IDs
Once we have split our text into tokens, the next step is to map these tokens to integer IDs, which can then be used for model training and embedding lookup. This mapping process involves building a vocabulary-essentially, a lookup table that assigns each unique token (word, punctuation, etc.) a specific integer.
1. Building a Vocabulary
The typical steps to build a vocabulary from the dataset are:
- Tokenize the entire text to collect all the individual tokens.
- Remove duplicate tokens by converting the list to a
set. - Sort the unique tokens alphabetically (for reproducibility and easier review).
- Assign an integer index to every unique token.
Here's how you can do this in Python (assuming preprocessed holds the list of all tokens from the text):
all_words = sorted(set(preprocessed))
vocab_size = len(all_words)
print(vocab_size)    # For example: 1130
2. Creating the Vocabulary Dictionary
To see how each token maps to an integer index:
vocab = {token: integer for integer, token in enumerate(all_words)}
for i, item in enumerate(vocab.items()):
    print(item)
    if i >= 50:
        break
Sample Output:
('!', 0)
('"', 1)
("''", 2)
...
('Her', 49)
('Hermia', 50)
Now, each individual token in the vocabulary is assigned its own unique integer label.
This vocabulary can be applied to convert any text (training set or new input) into a list of token IDs.
3. Converting Tokens to Token IDs
Once the vocabulary is built, you can map a list of tokens to their corresponding IDs like this:
token_ids = [vocab[token] for token in preprocessed]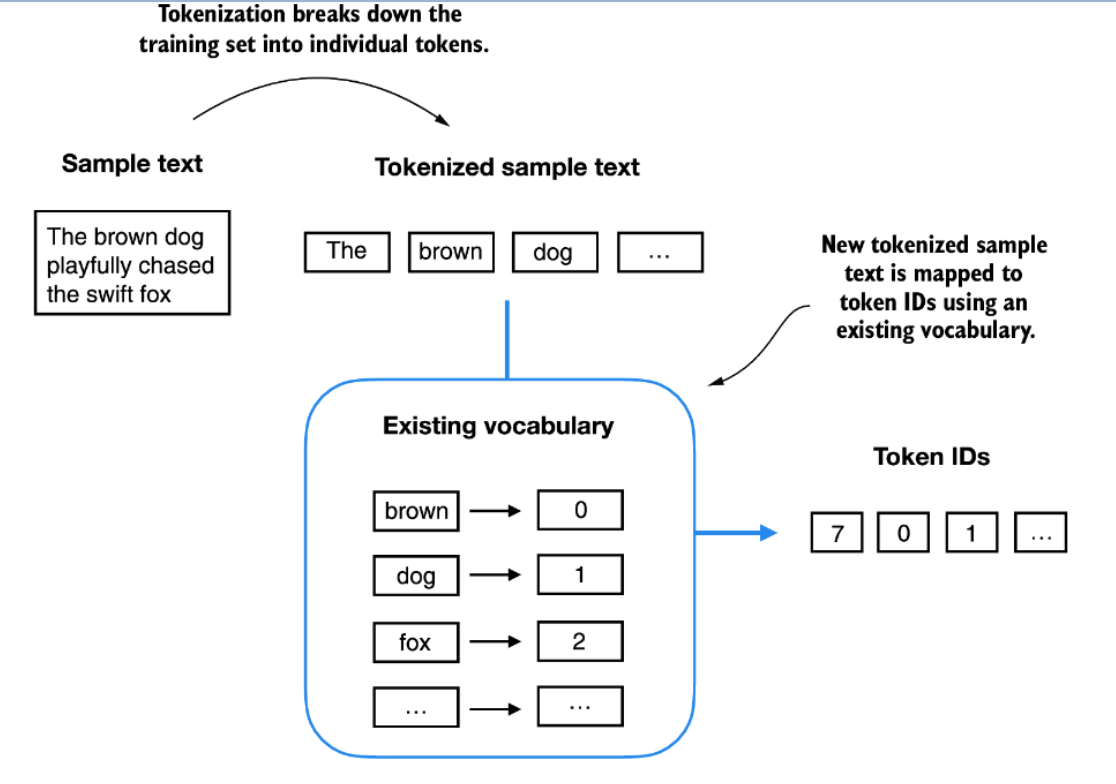
The same vocabulary can be used to map tokens from both the original training set and new input text into token IDs, ensuring consistent encoding for downstream tasks.
(Note: In this simplified example, the vocabulary may contain or omit special characters depending on your tokenization choices.)
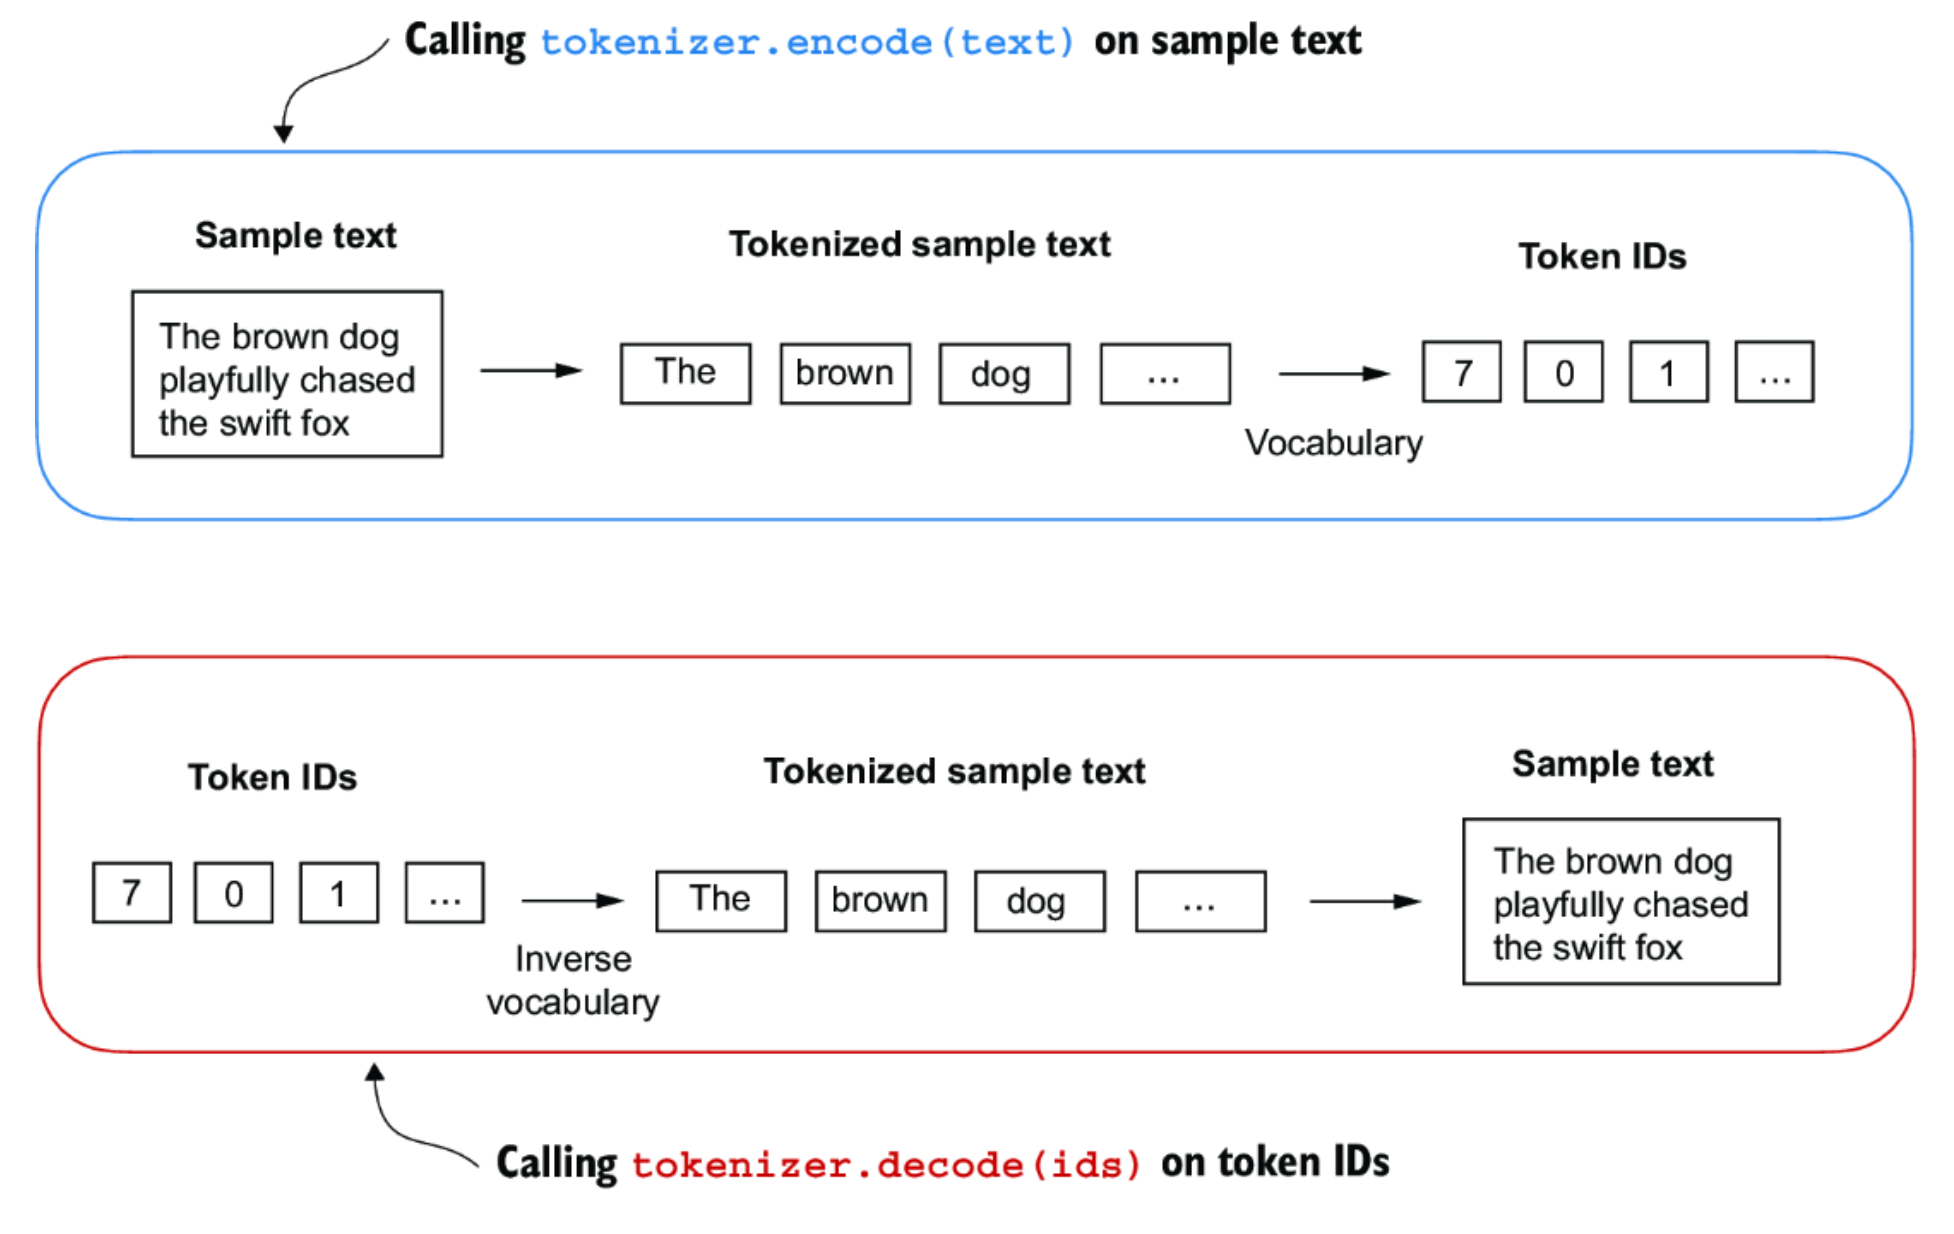
Mapping Token IDs Back to Text: The Inverse Vocabulary
When working with language models, it's essential to be able to both encode text to token IDs and decode token IDs back to text. The mapping from token ID to string is called the inverse vocabulary.
Why do we need an inverse vocabulary?
-'s predictions need to be mapped back into human-readable text.
- This is achieved by creating an inverse of the original vocabulary: a mapping from integer token IDs back to their corresponding string tokens.
Implementing a Complete Tokenizer
We can build a full tokenizer class that supports both encoding (text → IDs) and decoding (IDs → text). Here's what it does:
encode(text): Splits input text into tokens, then converts each token into its ID using the vocabulary dictionary.decode(ids): Maps each ID back to its token using the inverse vocabulary, and concatenates tokens to reconstruct natural text.
Summary:
encode(text): Splits and maps text to token IDs.decode(ids): Maps token IDs back to tokens and reconstructs the text.
Example Usage
Let's walk through an example using the SimpleTokenizerV1 class with a passage from Edith Wharton:
tokenizer = SimpleTokenizerV1(vocab)
text = "\"It's the last he painted, you know,\" Mrs. Gisburn said with pardonable pride."
ids = tokenizer.encode(text)
print(ids)
Sample Output:
[1, 56, 2, 850, 988, 602, 533, 746, 5, 1126, 596, 5, 1, 67, 7, 38, 8]Now, let's decode these IDs back to text:
print(tokenizer.decode(ids))Decoded Output:
"It's the last he painted, you know," Mrs. Gisburn said with pardonable pride.As shown, decode accurately reconstructs the original text from the token IDs.
Handling Out-of-Vocabulary Tokens
If you try to encode text that contains tokens not in the vocabulary, you'll encounter an error. For example:
text = "Hello, do you like tea?"
print(tokenizer.encode(text))
Result:
KeyError: 'Hello'The token "Hello" was not present in the original training text, so it's missing from the vocabulary. This illustrates the importance of building a sufficiently comprehensive vocabulary from a diverse training set when designing tokenizers for large language models.
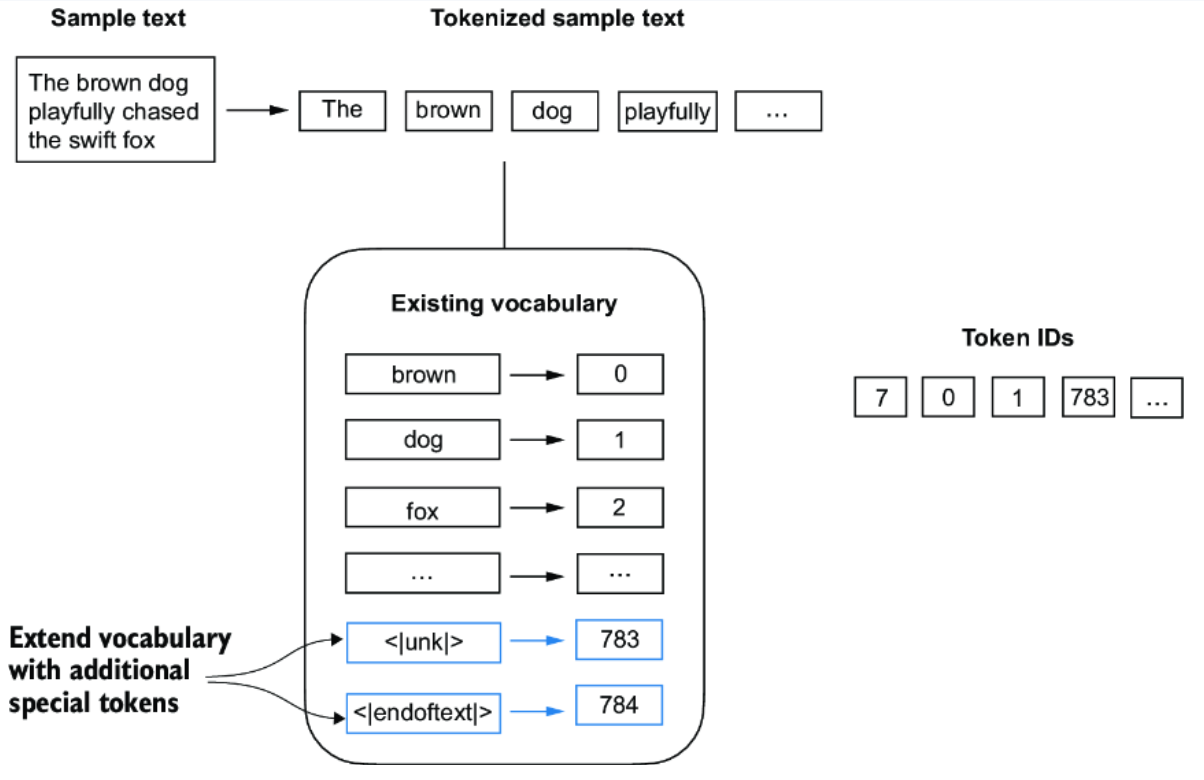
Adding Special Tokens to the Tokenizer
Modern language models often need special context tokens that serve a functional purpose beyond representing regular words. These help models handle unknown words and understand document boundaries.
Why Add Special Tokens?
- Unknown Words: In real-world text, new or rare words may appear that were not present during the tokenizer's training. We don't want our tokenizer to fail in these cases.
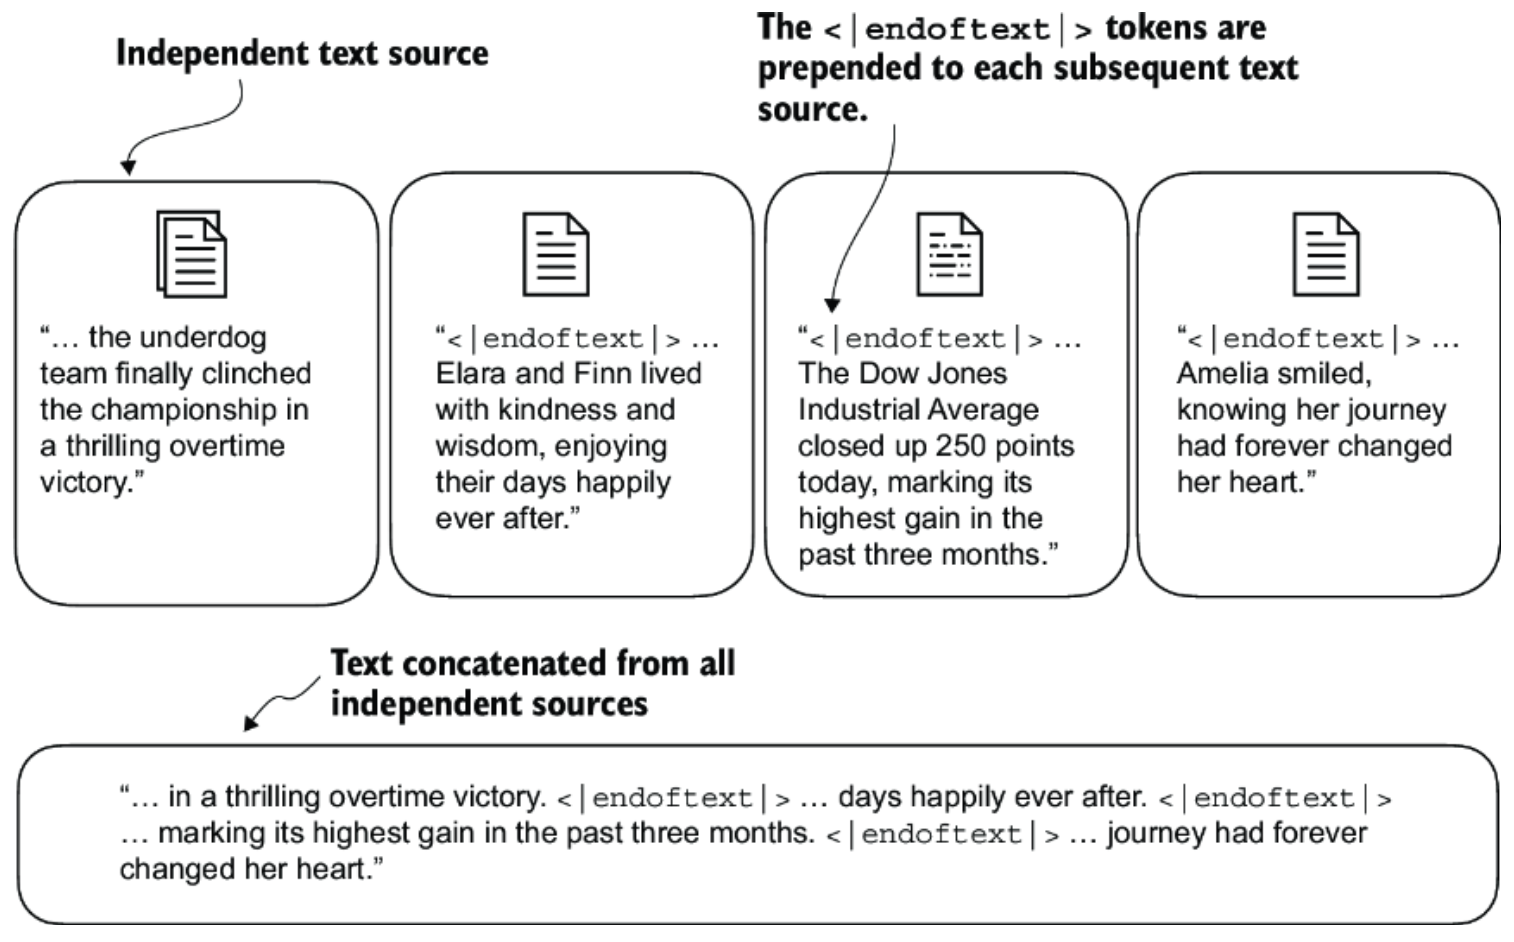
- Document Boundaries: When models are trained on multiple documents, it's important for them to distinguish where one document ends and another begins.
Special Tokens Used
In SimpleTokenizerV2, we introduce two important special tokens:
<unk>: for unknown or out-of-vocabulary words<endoftext>: to indicate the boundary between two unrelated text segments or documents
How Special Tokens Are Used
-
The
<unk>Token- If the tokenizer encounters a word that is not in its vocabulary, it replaces it with the
<unk>token instead of raising an error. - This allows the model to continue processing input smoothly, even if it has not seen some words before.
- If the tokenizer encounters a word that is not in its vocabulary, it replaces it with the
-
The
<endoftext>Token- When concatenating multiple documents or independent text sources for training, we separate them using
<endoftext>. - This signals to the LLM that the following text is from a different document, helping it avoid confusing unrelated contexts.
- When concatenating multiple documents or independent text sources for training, we separate them using
Summary
- Add
<unk>tokens for unknown words to improve robustness. - Insert
<endoftext>tokens between separate documents to maintain clear segment boundaries. - Using such special tokens makes the tokenizer and the downstream model more effective and reliable during both training and inference.
L4: RAG (Retrieval-Augmented Generation)
Retrieval-Augmented Generation (RAG) is a technique that enhances language model generation by incorporating external knowledge.
This is typically done by retrieving relevant information from a large corpus of documents and using that information to inform the generation process.
RAG has two phases: retrieval and generation.
- In the retrieval phase, algorithms search for and retrieve snippets of
information relevant to the user's prompt or question.
- In an open-domain, consumer setting, those facts can come from indexed documents on the internet
- in a closed-domain, enterprise setting, a narrower set of sources are typically used for added security and reliability.
- This assortment of external knowledge is appended to the user's prompt and passed to the language model.
- In the generative phase, the LLM draws from the augmented prompt and its
internal representation of its training data to synthesize an engaging answer
tailored to the user in that instant.
- The answer can then be passed to a chatbot with links to its sources.
Why Do We Need RAG?
The Problem
- Companies have massive amounts of proprietary documents
- Finding specific information is like "finding a needle in a haystack"
- Even advanced models like GPT-4 Turbo struggle with very long documents due to the "Lost in the Middle" phenomenon (the model forgets content in the middle of long texts)
The Solution RAG solves this by:
- Creating an index of document paragraphs
- Quickly identifying relevant paragraphs
- Feeding only the most relevant information to the AI
- Preventing information overload
- Enhancing response quality
How RAG Works (The Pipeline)
Three Main Stages:
- INGESTION (Preparing the Knowledge Base)
- Break documents into smaller chunks
- Convert chunks into numerical representations (embeddings)
- Store them in a database
- RETRIEVAL (Finding Relevant Information)
- User asks a question
- System searches the database for relevant chunks
- Ranks and filters the best matches
- SYNTHESIS (Generating the Response)
- Combines retrieved information with the user's question
- Feeds this enriched context to the language model
- Model generates an informed, accurate response
Types of Databases for RAG
- Vector Databases (Most Common)
- How it works: Uses semantic similarity (meaning-based search)
- Pros: Finds conceptually related information, even with different wording
- Cons: May retrieve irrelevant data occasionally
- Examples: Uses BERT, TF-IDF for embeddings
- Graph Databases
- How it works: Maps relationships between entities
- Pros: Very precise, structured knowledge
- Cons: Requires exact query matching (less flexible)
- SQL Databases
- How it works: Traditional structured data storage
- Pros: Good for structured data
- Cons: Lacks semantic flexibility
Hybrid Approach: Combine vector and graph databases for best results!
CHUNKING: Breaking Documents into Pieces
Why Chunk?
- Smaller chunks = more precise matching
- Larger chunks = better context but more noise
- Goal: Balance between precision and comprehensiveness
Chunking Strategies:
- Fixed-Size Chunking (Simplest)
- Choose a token count (e.g., 256 tokens)
- Add overlap between chunks (e.g., 20 tokens)
- Pros: Simple, cheap, prevents context loss
-
Context-Aware Chunking (Smarter)
(a) Sentence Splitting:
- Split by natural sentence boundaries
- Tools: NLTK, spaCy
- Better for maintaining meaning
(b) Recursive Chunking:
- Splits text hierarchically
- Uses multiple separators
- Adapts to create similar-sized chunks
Golden Rule:
"If the chunk makes sense to a human without surrounding context, it will make sense to the AI too."
EMBEDDINGS: Converting Text to Numbers
What Are Embeddings?
Numerical representations of text that capture meaning. Similar concepts have similar numbers.
Types of Embeddings:
- Sparse Embeddings (TF-IDF)
- Best for: Keyword matching
- Pros: Computationally cheap
- Cons: Doesn't capture deep meaning
- Semantic Embeddings (BERT, SentenceBERT)
- Best for: Understanding context and meaning
- BERT: Deep contextual understanding
- SentenceBERT: ⭐ Preferred for RAG - balances context with sentence-level meaning
Resources:
Check the Hugging Face MTEB Leaderboard to compare embedding models!
RETRIEVAL STRATEGIES
- Standard/Naive Approach
- Uses same chunk for embedding AND response generation
- Pros: Simple, efficient
- Cons: Limited context, may produce suboptimal responses
- Sentence-Window Retrieval (Small-to-Large)
- Retrieves small chunks for precision
- Expands with surrounding context for synthesis
- Pros: Precise retrieval + rich context for generation
- Cons: More complex, potential contextual gaps
- Retriever Ensembling
- Try multiple chunk sizes simultaneously (128, 256, 512, 1024)
- Use a re-ranker to select best results
- Pros: Better results, can benchmark strategies
- Cons: More expensive computationally
RE-RANKING: Refining Results
What is Re-ranking?
After retrieving documents, re-rank them by relevance to improve quality.
Re-ranking Techniques:
- Lexical Re-Ranking: Based on word matching (BM25, TF-IDF)
- Semantic Re-Ranking: Based on meaning (BERT, transformers)
- Learning-to-Rank (LTR): Trained models for ranking
- Hybrid Methods: Combines multiple signals
Popular Models: monoBERT, duoBERT, ListT5, ListBERT
RESPONSE GENERATION/SYNTHESIS
The Final Step
The model combines:
- Retrieved information
- Pre-trained knowledge
- User's original query
Critical Finding: "Lost in the Middle"
Research Shows:
- LLMs perform BEST when relevant info is at the beginning or end of context
- Performance DROPS when relevant info is in the middle
- Longer contexts can actually hurt performance
- Too many retrieved documents harm accuracy
Optimization Tips:
- Place most important information at the start or end
- Don't overload with too many documents
- Use ranking to boost performance by up to 20%
- Extended-context models aren't always better if content fits standard context
Introduction to Akka Actors in Java
Akka is a powerful toolkit and runtime for building highly concurrent, distributed, and resilient message-driven applications on the JVM (Java Virtual Machine). One of its core components is the Actor model, which provides a higher-level abstraction for managing concurrency compared to traditional thread-based approaches.
Key Concepts of Akka Actors
- Actors: The fundamental building blocks of Akka. Each actor is an independent unit of computation that encapsulates state and behavior.
- Messages: Actors communicate with each other by sending and receiving messages. Messages are immutable and can be of any type.
- Mailboxes: Each actor has a mailbox where incoming messages are queued until the actor is ready to process them.
- Supervision: Actors can monitor the behavior of other actors and take action in case of failures, allowing for a resilient system design.
Benefits of Using Akka Actors
- Concurrency: Akka actors provide a simple and effective way to manage concurrency without dealing with low-level thread management.
- Scalability: Akka applications can be easily scaled by adding more actors or distributing them across multiple nodes.
- Fault Tolerance: The supervision model allows for graceful recovery from failures, making Akka applications more resilient.
L8: Akka Actors in Java
This is a brief introduction to using Akka Actors in Java and it's basic featurs like defining actors, how they communicate, supervision, and how to kill them.
Typed vs Classic Actors
- In Akka, "typed" refers to the newer, more type-safe actor model where messages sent to an actor are strictly defined by its type, while "classic" refers to the older, less strictly typed actor model where actors can receive any type of message, requiring manual type checking through pattern matching.
- Essentially, Akka Typed provides better compile-time error detection and improved code clarity compared to classic Akka actors, making it the recommended choice for new projects, while classic actors are still supported for legacy applications.
Key Differences Between Akka Typed and Classic Actors
-
Type Safety
- Akka Typed: Actors are strongly typed; the allowed message types are explicitly defined. This means only messages of the correct type can be sent, improving safety.
- Classic Actors: Can receive any type of message. Manual type checking and pattern matching are required within the actor logic.
-
Error Detection
- Akka Typed: Type safety enables compile-time detection of type mismatches, reducing the risk of runtime errors.
- Classic Actors: Errors from sending unexpected message types are only discovered at runtime.
-
Supervision Strategy
- Akka Typed: By default, an actor that throws an exception is stopped. Supervision decisions are explicit and must be defined.
- Classic Actors: The default behavior on exceptions is to restart the actor. Supervision strategies often require more explicit configuration.
-
Code Readability
- Akka Typed: Message handling is more structured and explicit, which typically results in more readable and maintainable code. Less reliance on pattern matching.
- Classic Actors: Message handling often relies heavily on pattern matching, which can reduce clarity as actor logic grows.
Classic Actor example
public class HelloWorldActor extends AbstractActor {
  @Override
  public Receive createReceive() {
    return receiveBuilder()
      .match(String.class, message -> System.out.println("Received message: " + message))
      .build();
  }
}
Typed Actor example
public class HelloWorldActor extends AbstractBehavior<HelloWorldActor.Greet> {
  public static class Greet {
    public final String message;
    public Greet(String message) {
      this.message = message;
    }
  }
  public HelloWorldActor(ActorContext<Greet> context) {
    super(context);
  }
  @Override
  public Receive<Greet> createReceive() {
    return newReceiveBuilder()
      .match(Greet.class, message -> System.out.println("Received message: " + message.message))
      .build();
  }
}
Why is it called Behavior and not Actor?
In Akka Typed, a Behavior defines how an actor handles incoming messages.
- After processing a message, the actor can return a new Behavior to handle future messages, enabling dynamic changes to its behavior over its lifecycle.
- Actors are started with an initial Behavior and may evolve by replacing their Behavior as they process messages.
- The Behavior in Akka Typed is parameterized by the type of messages it can handle, providing compile-time type safety. This contrasts with classic actors, where the allowed message types are not strictly enforced.
An Actor
An actor represents an independent unit of computation in the actor model. Here are some important characteristics of actors:
- Encapsulation: Each actor encapsulates its own state and a portion of the application logic.
- Asynchronous Communication: Actors interact solely by exchanging asynchronous messages (never through direct method calls).
- Unique Address and Mailbox: Every actor has a unique address and a mailbox, where other actors can send messages.
- Sequential Message Processing: An actor processes messages from its mailbox in order, typically following a FIFO (First-In-First-Out) queue.
- Hierarchy: The actor system is structured as a tree-like hierarchy.
- Lifecycle and Creation: An actor can:
- Create new actors,
- Send messages to any other actor,
- Stop itself or any actors it has created.
Developing concurrent applications is challenging due to the need for synchronization, locks, and managing shared memory. Akka actors simplify asynchronous programming by eliminating the direct use of locks and synchronization.
Key advantages of Akka actors:
- Asynchronous Messaging: Instead of blocking method calls, actors communicate by exchanging messages. The sender thread does not wait for a return value when sending a message; instead, the receiving actor can respond with a separate reply message.
- No Explicit Synchronization Required: Since all messages sent to an actor are processed sequentially, there is no risk of concurrent modification to an actor's internal state. This avoids the complexity of manual synchronization in multi-threaded environments.
- Error Handling and Supervision: Akka's actor hierarchy enables robust error management. If an actor fails, it can notify its parent actor, which can then decide how to handle the failure-such as stopping or restarting the child actor.
Overall, Akka actors make it easier to write reliable concurrent applications by providing safe message-passing, removing the need for manual synchronization, and facilitating structured error handling through actor hierarchies.
Actor System
Actors in Akka are organized in a hierarchical system known as the Actor System.
-
ActorSystem:
All actors that share a common configuration are managed by anActorSystem. TheActorSystemserves as the root of the actor hierarchy and provides configuration, supervision, and thread management.For example, you can create an
ActorSystemwith a default configuration and a custom name:ActorSystem system = ActorSystem.create("test-system"); -
Default Actors in ActorSystem:
Even before you've created your own actors, theActorSystemcontains three main actors by default:- Root Guardian Actor (
/):- Represents the root of the actor hierarchy.
- User Guardian Actor (
/user):- Parent of all user-defined actors.
- All actors that you create will become children of this guardian.
- System Guardian Actor (
/system):- Parent for all system-internal actors defined by Akka itself.
- Root Guardian Actor (
This hierarchical structure is foundational for actor supervision, message routing, and fault tolerance in Akka.
Creating a Basic Akka Actor
To define an actor in Akka (Classic API), create a class that extends AbstractActor and implement the createReceive() method to handle incoming messages:
public class MyActor extends AbstractActor {
    @Override
    public Receive createReceive() {
        return receiveBuilder().build();
    }
}- This example shows the simplest possible actor. Since no message patterns are provided to the
ReceiveBuilder, the actor will discard all incoming messages. - We'll discuss how to add message handlers using pattern matching later in the lecture.
Adding the Actor to the ActorSystem
Once you have defined your actor, you can create an instance and include it in the ActorSystem as follows:
ActorRef myActorRef = system.actorOf(Props.create(MyActor.class), "my-actor");- This will register your
MyActorin the actor system, ready to receive messages from other actors.
Actor Configuration and Props
In Akka, the Props class is used to define the configuration of an actor. Props encapsulate configuration details such as the dispatcher, mailbox, or deployment options that will be applied to the actor.
Propsis immutable and thread-safe, allowing it to be safely reused when creating multiple actors.- As a best practice, it is recommended to define factory methods inside the actor class itself to encapsulate the creation of the
Propsobject.
Example: Defining an Actor with Props
Suppose we want to define an actor that performs some text processing and should receive a String as input. We can structure the actor and its factory method as follows:
public class ReadingActor extends AbstractActor {
    private String text;

    public ReadingActor(String text) {
        this.text = text;
    }

    // Factory method for creating Props
    public static Props props(String text) {
        return Props.create(ReadingActor.class, text);
    }

    // ... implement createReceive() ...
}
Creating an Actor Instance with Props
To create an instance of this type of actor and register it in the actor system, you use the props() method and pass the required argument:
ActorRef readingActorRef = system.actorOf(ReadingActor.props(TEXT), "readingActor");Now that we've covered how to configure and instantiate actors, let's move on to how actors communicate within the actor system.
Sending Messages in Akka
In the Akka actor system, communication between actors is performed using various message-sending methods:
tell()ask()forward()
1. tell() Method
Use tell() when you want to send a message without expecting a response. This is the most efficient way to send a message.
readingActorRef.tell(new ReadingActor.ReadLines(), ActorRef.noSender());- First parameter: The message sent to the actor (
readingActorRefin the example above). - Second parameter: The sender of the message.
- Set to
nullorActorRef.noSender()if you do not expect a reply. - Useful if the actor receiving the message needs to reply to someone other than the sender (e.g., the parent of the sending actor).
- Set to
2. ask() Method
Use ask() when you expect a response from the actor. This method returns a CompletionStage so the processing can remain non-blocking.
CompletableFuture<Object> future = ask(wordCounterActorRef, new WordCounterActor.CountWords(line), 1000)
.toCompletableFuture();- When requesting a response, always be aware of error handling:
- If an actor throws an exception while processing a message and does not explicitly send an error in the reply, the
ask()call will eventually timeout with no indication of the exception. - To propagate exceptions, send a
Status.Failuremessage to the sender.
- If an actor throws an exception while processing a message and does not explicitly send an error in the reply, the
Example error reply:
@Override
public Receive createReceive() {
    return receiveBuilder()
        .match(CountWords.class, r -> {
            try {
                int numberOfWords = countWordsFromLine(r.line);
                getSender().tell(numberOfWords, getSelf());
            } catch (Exception ex) {
                getSender().tell(new akka.actor.Status.Failure(ex), getSelf());
                throw ex;
            }
        })
        .build();
}
3. forward() Method
The forward() method is similar to tell(), but it forwards the original sender information. The intermediary actor does not change the sender of the message.
printerActorRef.forward(
    new PrinterActor.PrintFinalResult(totalNumberOfWords), getContext()
);
Receiving Messages
Each actor implements the createReceive() method, which handles all received messages. The receiveBuilder() allows you to define handlers for message types, acting like a switch statement.
Example:
public Receive createReceive() {
    return receiveBuilder()
        .matchEquals("printit", p -> {
            System.out.println("The address of this actor is: " + getSelf());
        })
        .build();
}- Messages are processed in a FIFO (First-In, First-Out) queue, ensuring sequential handling.
Stopping & Killing Actors
Stopping an Actor
To stop an actor (or any of its children), use the stop() method. Stopping is asynchronous-current message handling completes before shutdown.
system.stop(myActorRef);- No further messages will be accepted once stopping begins.
- Stopping a parent actor will also stop its child actors.
- To stop the entire actor system and free resources:
Future<Terminated> terminateResponse = system.terminate();This terminates all actors in the Akka system.
Special Messages for Actor Termination
-
PoisonPill: Send a
PoisonPillmessage to enqueue termination after all prior messages are processed.myActorRef.tell(PoisonPill.getInstance(), ActorRef.noSender());- The actor handles all remaining messages until it reaches the
PoisonPill, then begins termination.
- The actor handles all remaining messages until it reaches the
-
Kill: Send a
Killmessage to cause the actor to immediately throw anActorKilledException:myActorRef.tell(Kill.getInstance(), ActorRef.noSender());
L9: Typed Actors in Akka
Interaction Patterns in Typed Akka Actors
- In Akka, communication with an actor occurs via an
ActorRef<T>, whereTdenotes the type of messages the actor accepts. This type-safe mechanism acts as the actor's “protocol”. - By utilizing
ActorRef<T>, Akka ensures that only valid message types can be sent to a given actor. Furthermore, it encapsulates the actor’s internal state, making it accessible only to the actor itself. - There are several common interaction patterns for exchanging messages with actors. Let's review these patterns in detail.
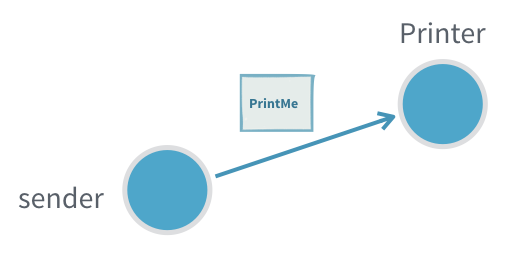
1. Fire-and-forget
The fundamental way to interact with an actor is through actorRef.tell(message). Sending a message with tell can safely be done from any thread.
Tell is asynchronous which means that the method returns right away. After the statement is executed there is no guarantee that the message has been processed by the recipient yet. It also means there is no way to know if the message was received, the processing succeeded or failed.
Useful when:
- It is not critical to be sure that the message was processed
- There is no way to act on non successful delivery or processing
- We want to minimize the number of messages created to get higher throughput (sending a response would require creating twice the number of messages)
Problems:
- If the inflow of messages is higher than the actor can process the inbox will fill up and can in the worst case cause the JVM crash with an OutOfMemoryError
- If the message gets lost, the sender will not know
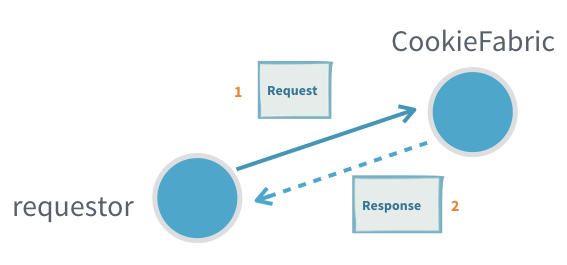
2. Request-Response
Many interactions between actors require the receiving actor to send back one or more response messages.
A response message may:
- provide the result of a query,
- serve as an acknowledgment that the message was received and processed, or
- represent events that the requester has subscribed to.
In Akka, the recipient of the response must be specified as part of the message, usually by including an ActorRef field for replies. The receiving actor can then use this reference to send (tell) its response back to the original sender.
Useful when:
- Subscribing to an actor that will send many response messages back
Problems:
- Actors seldom have a response message from another actor as a part of their protocol (see adapted response)
- It is hard to detect that a message request was not delivered or processed (see ask)
- Unless the protocol already includes a way to provide context, for example a request id that is also sent in the response, it is not possible to tie an interaction to some specific context without introducing a new, separate, actor (see ask or per session child actor)
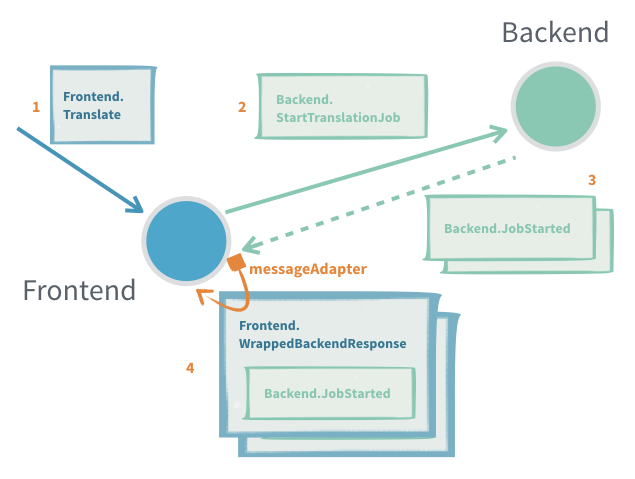
3. Adapted Response
Most often the sending actor does not, and should not, support receiving the response messages of another actor. In such cases we need to provide an ActorRef of the right type and adapt the response message to a type that the sending actor can handle.
Useful when:
- Translating between different actor message protocols
- Subscribing to an actor that will send many response messages back
Problems:
- It is hard to detect that a message request was not delivered or processed (see ask)
- Only one adaption can be made per response message type, if a new one is registered the old one is replaced, for example different target actors can't have different adaption if they use the same response types, unless some correlation is encoded in the messages
- Unless the protocol already includes a way to provide context, for example a request id that is also sent in the response, it is not possible to tie an interaction to some specific context without introducing a new, separate, actor
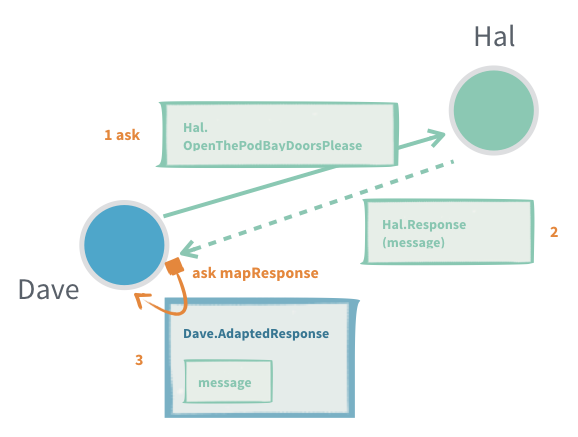
4. Request-Response with ask between two actors
In an interaction where there is a 1:1 mapping between a request and a response we can use ask on the ActorContext to interact with another actor.
The interaction has two steps, first we need to construct the outgoing message, to do that we need an ActorRef<Response> to put as recipient in the outgoing message. The second step is to transform the successful Response or failure into a message that is part of the protocol of the sending actor. See also the Generic response wrapper for replies that are either a success or an error.
The response adapting function is running in the receiving actor and can safely access its state, but if it throws an exception the actor is stopped.
Useful when:
- Single response queries
- An actor needs to know that the message was processed before continuing
- To allow an actor to resend if a timely response is not produced
- To keep track of outstanding requests and not overwhelm a recipient with messages ("backpressure")
- Context should be attached to the interaction but the protocol does not support that (request id, what query the response was for)
Problems:
- There can only be a single response to one ask (see per session child Actor)
- When ask times out, the receiving actor does not know and may still process it to completion, or even start processing it after the fact
- Finding a good value for the timeout, especially when ask triggers chained asks in the receiving actor. You want a short timeout to be responsive and answer back to the requester, but at the same time you do not want to have many false positives
5. Request-Response with ask from outside an Actor
Sometimes you need to interact with actors from the outside of the actor system, this can be done with fire-and-forget as described above or through another version of ask that returns a CompletionStage<Response> that is either completed with a successful response or failed with a TimeoutException if there was no response within the specified timeout.
To do this we use akka.actor.typed.javadsl.AskPattern.ask to send a message to an actor and get a CompletionState[Response] back.
Useful when:
- Querying an actor from outside of the actor system
Problems:
- It is easy to accidentally close over and unsafely mutable state with the callbacks on the returned CompletionStage as those will be executed on a different thread
- There can only be a single response to one ask (see per session child Actor)
- When ask times out, the receiving actor does not know and may still process it to completion, or even start processing it after the fact
6. Generic response wrapper
In many cases, responses can either be a successful result or an error (e.g., a validation error if a command was invalid).
The Problem:
- Defining two separate response classes (Success/Failure) and a shared supertype for every request can become repetitive.
- In clustered/distributed contexts, you also have to ensure these messages are serializable for network transfer.
Akka's Solution: StatusReply
- Akka provides a generic status-response type called
StatusReply. - Whenever you use
ask, Akka also offersaskWithStatus. This method works with responses wrapped inStatusReply, automatically unwrapping successful results and helping with error handling. - Akka comes with built-in serializers for
StatusReply, so you only need to implement your serializer for the actual success value.
Usage Pointers:
- If the response is just an acknowledgement (does not contain a value), use
StatusReply.ack(), which is of typeStatusReply<Done>. - Errors are best conveyed as descriptive text, but you can also send exceptions to attach error types.
This approach reduces boilerplate and makes it easier to implement uniform, network-friendly request/response patterns in Akka.
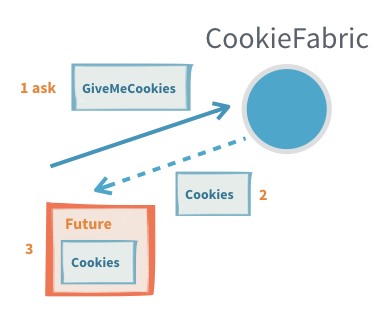
7.Ignoring replies
Sometimes, an actor protocol expects a reply, but the sender doesn't care about the response. In such cases, Akka offers system.ignoreRef(), which returns a special ActorRef that silently discards any messages sent to it. This effectively converts a request-response interaction into a fire-and-forget.
How to Use:
- When sending a request, instead of providing your own
ActorReffor the reply, providesystem.ignoreRef()(in Scala) orcontext.getSystem().ignoreRef()(in Java). - This tells the receiving actor to send the response to an ActorRef that ignores messages.
Example (Java):
cookieFabric.tell(
    new CookieFabric.Request("don't send cookies back", context.getSystem().ignoreRef()));
When is this useful?
- When you send a message that, according to the protocol, expects a reply-but you don't need that reply.
Cautions and Pitfalls:
- The returned
ActorRefignores all messages sent to it, so use it carefully. - Accidentally passing it around as if it were a regular
ActorRefcan break communication patterns between actors. - Using
ignoreRef()as a reply target for anaskinteraction from outside the Actor system causes the resultingCompletionStageto never complete (it times out). - It's technically possible to "watch" this special ActorRef, but it will never terminate, so you'll never receive a
Terminatedsignal.
8. Sending Future Results to Self with pipeToSelf
When interacting with APIs that return a CompletionStage (such as async database calls or remote services) from inside an Akka actor, a common requirement is to process the result inside the actor once the future completes. Akka provides the pipeToSelf method on ActorContext specifically for this use case.
Why use pipeToSelf instead of callbacks?
- Attaching a callback (
thenApply, etc.) directly on theCompletionStagecan be dangerous: those callbacks may run on arbitrary threads, which breaks the actor's single-threaded illusion. This means you should never mutate actor state inside a future callback. - Instead, with
pipeToSelf, the result of theCompletionStageis sent back to the actor as a message. The actor processes it through its regular message handling, ensuring all state access is safe.
Example Flow:
Suppose an actor CustomerRepository calls a method on CustomerDataAccess that returns a CompletionStage:
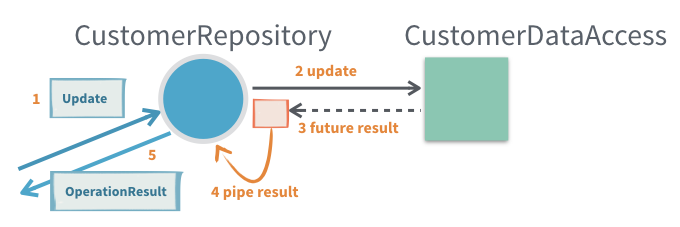
context.pipeToSelf(
  customerDataAccess.getCustomerById(id),
  (value, exception) -> exception == null
    ? new WrappedResult(value)
    : new FailedResult(exception)
);- The actor does not process the future’s result in a callback!
- Instead, the result is transformed into one of the actor’s own messages (
WrappedResultorFailedResult), which the actor then handles as usual.
Common Use Cases:
- Accessing data/services from within an actor (e.g., database, HTTP APIs) that return futures.
- Continuing operating or responding to a requester only after the async result is ready.
- Preserving state/context (such as an original
replyToreference) throughout the async interaction.
Benefits:
- Ensures that processing the async result is always done inside the actor’s mailbox, preserving single-threaded safety.
- Keeps logic structured in terms of your actor’s protocol.
Potential Drawbacks:
- Introduces minor boilerplate: you often need to define wrapper messages to carry the result (or failure) of the asynchronous operation back into the actor.
9. Per-Session Child Actor
Sometimes, generating a complete response to a request requires collecting and aggregating multiple answers from other actors. In these situations, it's useful to delegate the work to a dedicated child actor, often called a "per-session child actor." This child actor is created for the duration of a particular request/session and is responsible for orchestrating the process, which might include:
- Retrying failed operations
- Handling timeouts
- Aggregating multiple responses
- Monitoring progress or performing "tail chopping" (querying multiple sources in order until one answers)

Note:
This pattern is essentially how theaskpattern is implemented under the hood. If you simply need to collect a single response with a timeout, prefer usingaskdirectly.
In practice, session children will almost always include a timeout mechanism (typically by scheduling a message to themselves) to avoid hanging indefinitely.
How it works:
- The parent actor creates a session child actor for the specific request, providing it with all necessary context and an
ActorRefto send the final result to. - The session child manages the interactions with other actors. Once all required information is collected, it sends the aggregated response back through the provided
ActorRefand then stops itself. - Since the session child's protocol is considered an implementation detail (not part of the public API), it's commonly designed to accept generic messages (such as
Object), rather than defining a strict protocol and message adapter.
When is a per-session child actor useful?
- Aggregating multiple results: A single incoming request requires coordination of several other actor responses before a final result can be created (e.g., data aggregation).
- At-least-once delivery: Managing acknowledgements and retries for robust message delivery.
Potential issues (Problems):
- Lifecycle management: Each child actor consumes resources, so their lifecycles must be carefully managed to prevent leaks (e.g., forgetting to stop a session actor after it's finished).
- Increased concurrency complexity: Each session child runs concurrently with its parent and siblings, increasing the overall system complexity and the need for safe resource handling.
10. General-Purpose Response Aggregator
The general-purpose response aggregator pattern extends the "per-session child actor" pattern by focusing on reusable aggregation logic. Instead of duplicating aggregation code in multiple places, you can extract it into a dedicated, reusable actor that handles the coordination of multiple asynchronous responses.
Why use this pattern?
Often in distributed and concurrent systems, the same method of collecting and aggregating responses from multiple actors is required in different parts of the system. Rather than duplicating code, you can implement a general-purpose aggregator actor which is parameterized as needed for each use case.
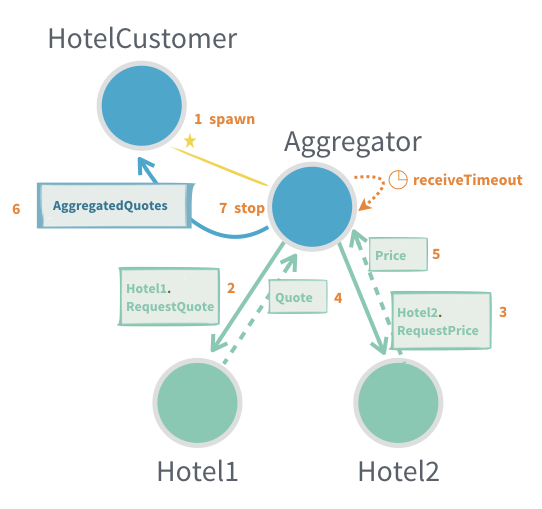
When is a General-Purpose Aggregator Useful?
- When response aggregation logic is reused in multiple places and should be centralized in a single actor.
- If a single incoming request fans out into multiple requests to other actors, whose responses must be gathered and combined before sending a result back.
- When you need to manage acknowledgement and retry messages for at-least-once delivery.
Main Considerations:
-
Customization:
There are many variations of this pattern-hence, it is provided only as an example in Akka documentation and not as a built-in behavior. It should be adapted to your system’s needs. -
Typical Use Cases:
- Aggregating multiple responses to a single client request (e.g., querying multiple data sources).
- Coordinating batch processing where partial results are incrementally gathered.
- Handling retries and acknowledgements for robust and reliable messaging.
Potential Issues / Challenges:
- Type Safety:
Message protocols that use generic types can be tricky, because type parameters are erased at runtime in Java/Scala. This may complicate handling messages in a type-safe way. - Resource Management:
Each aggregator (often implemented as a child actor) must be correctly stopped when its work is done to avoid resource leaks. Failing to manage actor lifecycles can lead to memory/resource issues. - Concurrency Complexity:
Since each aggregator can execute concurrently with other aggregator instances, their parent, and other siblings, overall system complexity and the need for careful management increase.
In summary: The general-purpose response aggregator pattern allows for reusable, modular aggregation of multiple asynchronous actor responses, but requires care in design for type safety, resource management, and concurrency.
11. Latency Tail Chopping
Latency tail chopping is an optimization technique derived from the general-purpose response aggregator pattern. It aims to reduce high-latency outliers (the “tail” of the latency distribution) in systems where multiple actors are capable of performing the same task. If an actor sometimes responds slowly, sending the same request to another actor (a “backup request”) can mitigate the impact of slow responses-because it is unlikely that multiple actors are delayed at the same time.
This pattern is discussed in Jeff Dean's talk: Achieving Rapid Response Times in Large Online Services. Akka provides this only as an example pattern, not a built-in behavior, as it should be tailored to specific use cases.
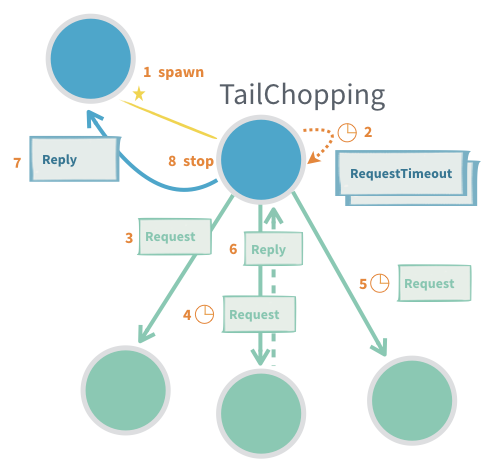
How it works:
- An initial request is sent to one actor.
- If no response arrives within a short timeout, a “backup” request is sent to another actor that can perform the same task.
- The first successful response is used; any duplicate responses or work can be ignored/discarded.
When to Use:
- When minimizing high-percentile latencies and reducing variability is important.
- When “work” (tasks) are safe to perform more than once, i.e., they are idempotent (e.g., information retrieval where repeated execution does not cause undesired effects).
Advantages:
- Reduces the impact of occasional outlier delays.
- Helps maintain consistent response times despite unpredictable actor performance.
Potential Issues:
- Increased load: More actors/processes handle the same request, increasing system workload.
- Not suitable for non-idempotent work: If tasks must only be performed once, this pattern should not be used.
- Type safety: Using generic message protocols introduces complexity, as type information can be erased at runtime in Java/Scala.
- Lifecycle management: Each “session” or child actor created must be terminated when done to avoid resource leaks. It is easy to overlook actors that are no longer needed.
Summary:
Latency tail chopping proactively reduces high-latency events by issuing redundant/backup requests to multiple actors capable of servicing a request, trading increased resource usage for improved reliability and faster average response times.
12. Scheduling Messages to Self
Actors can schedule messages to themselves using Akka timers. This is commonly used for batching, throttling, periodic jobs, and timeouts.
A classic example is the Buncher actor, which buffers incoming messages and emits them as a batch after a timeout or once a max batch size is reached:
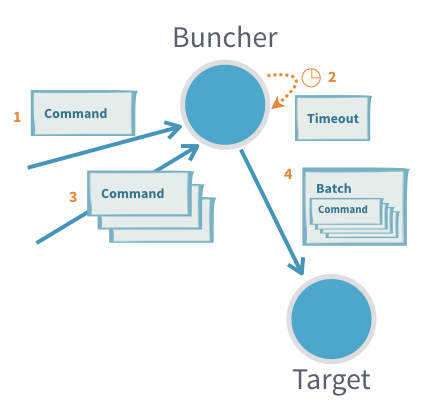
Key Concepts:
- Timers via
Behaviors.withTimers:
UseBehaviors.withTimersto access aTimerScheduler. Timers are tied to the actor’s lifecycle and automatically cleaned up when the actor stops or restarts. - Timer Uniqueness:
Each timer has a key. Setting a timer with an existing key cancels the old one; only the latest will deliver a message-ensuring no stale timer messages. - Types of Timers:
- Single timer: Delivers a single message after a delay.
- Periodic timer: Repeats messages at a fixed interval.
Periodic Scheduling:
- Fixed-delay: (
startTimerWithFixedDelay)- Delay between messages is always at least the specified interval.
- Good for smooth, regular activities.
- Fixed-rate: (
startTimerAtFixedRate)- Tries to maintain a consistent frequency; if messages are delayed (e.g., JVM pause), "missed" executions are sent rapidly to catch up.
- Suitable for time-sensitive recurring tasks (e.g., countdown timer).
Tip: If unsure, prefer fixed-delay for more natural, steady scheduling.
Summary:
Timers allow actors to manage recurring or delayed tasks reliably. Timer messages are never sent after the actor has stopped, and proper usage prevents duplicate or missed events.
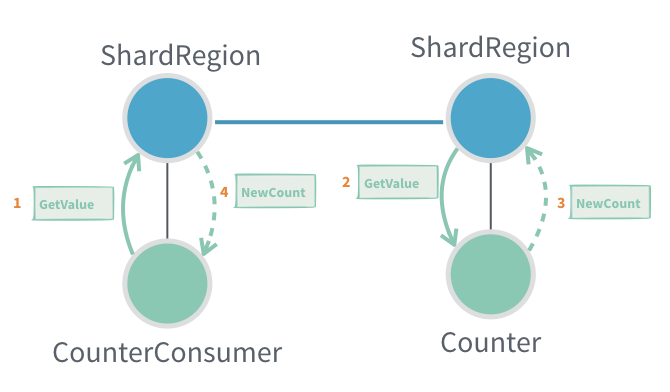
13. Responding to a Sharded Actor
When using Akka Cluster Sharding, responding to sharded actors presents unique challenges because:
- An actor instance may move to another node or be passivated (temporarily stopped) for resource efficiency.
Standard Reply Pattern
- Typical approach:
- Include the sender’s
ActorRef(usually via a message adapter) in the message so the actor can reply directly.
- Include the sender’s
- Problem:
- If you include
ctx.getSelf()and the receiving (sharded) actor is stopped/moved before replying, the response will go to dead letters (i.e., lost).
- If you include
Alternative Patterns
1. Pass the entityId and Route Reply via Sharding
- Include the
entityIdin your message. - The sharded actor generates the response and sends it via sharding instead of directly to the sender.
- Limitation:
- You cannot use message adapters, so the reply must use the protocol of the original actor.
- If the
EntityTypeKeyis not statically known, it must be included as well.
2. Use EntityRef Instead of ActorRef
- Send an
EntityRef(a proxy for the sharded actor) as the reply destination. EntityRefautomatically wraps outgoing messages in aShardingEnvelopeand routes them via sharding.- If the target entity was passivated, the message wakes and delivers to the new instance.
- If the entity moved, it routes to the new location.
- Note:
- Using
EntityRefcurrently requires a custom serializer. - Like above, message adaptation (adapters) is not supported-responses must match the protocol.
- Using
3. Use RecipientRef (Supertype of ActorRef and EntityRef)
- Define messages with a
RecipientRef, which can be either anActorReforEntityRef. - This offers flexibility in reply routing.
- Note:
- Serialization of
RecipientRefalso requires a custom serializer at this time.
- Serialization of
Summary Table
| Pattern | Pros | Cons |
|---|---|---|
ActorRef as reply address | Simple, allows message adapters | Fails if sharded actor moves/passivates |
entityId + sharding route | Always reaches current instance | Cannot use message adapters, protocol must match |
EntityRef as reply address | Transparent sharding, handles movement | No adapters, requires custom serializer |
RecipientRef | Max flexibility (ActorRef or EntityRef) | Custom serializer required, no adapters |
Visual Illustration:
Key Takeaways:
- Direct replies in a sharded Akka system require careful design.
- Message routing mechanisms and serialization capabilities may limit which approach fits your use case.
- Always ensure your reply route will reach the intended recipient, even across passivation and migration.
L11: Akka Components
Akka Programming Models
Akka is an open-source toolkit and runtime for building concurrent and distributed applications on the Java Virtual Machine (JVM). It supports various programming models but is primarily centered around actor-based concurrency, drawing inspiration from Erlang. While this is a succinct high-level description, Akka's capabilities extend far beyond.
Distributed by Design
- Akka is designed to work not just on multicore and single-computer systems but also across clusters of machines.
- The programming model remains consistent whether running locally or in a distributed environment.
- This consistency eases development and testing-local testing can mirror production cluster deployments.
- Interactions are modeled as message passing (unlike RPC-based systems, which focus on procedure calls). This distinction is fundamental.
Actor Logic Consistency
- Actor logic remains the same regardless of locality; actors can be local (same JVM) or remote (different JVM/machine).
- Communication, message delivery, and error handling concepts do not change between local and distributed actors.
- Akka is central to developing Reactive applications, as described in the Reactive Manifesto, supporting responsiveness, resilience, elasticity, and message-driven design.
Akka Component Overview
- Akka includes a core set of libraries and a variety of optional, open-source and commercial add-ons.
- Lightbend provides commercial Akka support, indemnification, and services.
- This commercial ecosystem reduces risks for organizations and still welcomes hobbyists and individuals.
Core Akka Concepts
Actors
- Actors are Akka's primary building block.
- They implement the Actor Model: no shared state, asynchronous message passing, and a sophisticated error hierarchy.
- Distributed and clustering support expand upon the single-JVM core.
ActorRef and Isolation
- Actors interact solely via message passing.
- To communicate with an actor, you use an
ActorRef, which acts as a protective proxy. - No synchronous method calls are permitted, keeping actors decoupled.
The Single-Threaded Illusion
- Each actor processes its messages one at a time, generating the "single-threaded illusion".
- While inside an actor, you can expect exclusive access to that actor’s state.
- Care must be taken not to break this illusion (special cases will be discussed later).
Message Passing and State Changes
ActorRefprovides methods for sending messages, usually immutable case classes.- Mutable messages are discouraged as they can break Akka's concurrency guarantees.
- Actors can change internal state via mutable fields or by switching behavior through
context.become.
Child Actors and Supervision
- Actors can create child actors using factory methods.
- Each actor knows its parent and children; supervision means parents monitor the health and errors of their children.
- Errors propagate separately from normal messages, streamlining error management.
Error Handling and "Let It Crash"
- Errors in Akka flow to supervising parents, not to callers. Supervisors decide how to recover: ignore, restart, or stop the failed actor.
- The "let it crash" philosophy means actors are allowed to fail, and the system recovers gracefully.
- Clients of a failed actor continue using the same
ActorRefwithout concern for the underlying replacement.
Event Bus
- Akka offers an event bus for one-to-many messaging, allowing actors to publish and subscribe to events by type.
- Suited for local messaging; the publish/subscribe module generalizes this for clusters.
Distribution in Akka
Remoting
- Actors can be local or remote (on different JVMs/machines), a property hidden behind location transparency.
- Remoting lets actors communicate across the network, with messages serialized/deserialized as needed.
- Actor addresses are unique within and across JVMs.
- The serialization and communication protocols are pluggable.
- Remoting is activated via configuration (no code changes required), but has no built-in node discovery.
Clustering
-
For larger setups, Akka Clustering automates group membership and message routing, making actor location fully transparent.
-
Nodes join a cluster through one or more seed nodes (special entry points).
-
Internal cluster management uses a gossip protocol, exchanging membership information until all nodes agree ("convergence"). Vector clocks help resolve message orderings.
-
Cluster lifecycle events (node joined/left, failures, etc.) generate event messages for optional monitoring and control.
-
The Phi Accrual failure detector helps detect unreachable nodes, complemented by heartbeat messages.
Cluster Leadership
- Each cluster elects a leader to add/remove members and to coordinate rebalancing.
- The leader is not a single point of failure; leadership transitions transparently if needed.
Partitioning and Split-Brain
- Network partitions ("split-brain") can create two separate clusters, violating invariants (e.g., singleton uniqueness).
- Autodowning (automatically removing unreachable nodes) can exacerbate split-brain; it is best disabled in production.
- Minimum cluster sizes and commercial split-brain resolver add-ons provide further mitigation.
Advanced Features
Cluster Sharding
-
Sharding distributes actors/data across the cluster using a shard key (e.g., first letter of a customer name).
-
This divides load and enables scalability.
-
Each node may handle multiple shard regions.
-
Shard envelopes route messages to the correct region.
-
Cluster Sharding Advantages:
- Scalable storage: actor state can persist on only those nodes handling the shard.
- State recovery: actor state is replayed from a journal/log for restart.
- Useful for "distributed domain" architectures: a single actor maintains state for a domain entity located within one shard.
-
Caveats:
- Restricts cluster flexibility if not carefully managed.
Cluster Singleton
- Ensures exactly one instance of a specific actor runs cluster-wide.
- Each node can launch a singleton; only one succeeds.
- If that node fails, another takes over.
- Cluster proxy actors handle message routing to the current singleton.
- Can be a scalability bottleneck and should be used with caution.
Akka HTTP
- Replaces the Spray HTTP library, fully integrated with Akka and Akka Streams.
- Builds REST APIs and interfaces Akka with the web ecosystem.
- Akka HTTP is the recommended way to expose actors as REST endpoints.
Testing in Akka
TestKit
-
Testing concurrent/distributed code is notoriously hard, but Akka's TestKit simplifies this process.
-
Allows testing actors synchronously (offering easy, but not always realistic, deterministic tests).
-
Also enables verification of asynchronous/nondeterministic message passing via stubs, message assertions, and timeouts.
-
Multi-JVM Tests: Enable comprehensive distributed testing by simulating multiple JVMs (or even real nodes), vital for production-grade distributed actor systems.
Additional Modules and Integrations
Contrib
- Akka's “contrib” library contains many contributed tools not in core modules: e.g., for message throttling, aggregation, and more.
Akka OSGi
- Integrates Akka with OSGi (Open Service Gateway Initiative), a Java framework for modular applications.
- OSGi provides a dynamic component model for modular Java applications called bundles and manages their collaboration as services.
- OSGi resources
More on OSGi
Intro to OSGi
OSGi Advantages:
- Easier development and testing, increased code reuse, simpler builds, easier deployment, and earlier bug detection.
- Supports advanced features like hot deployment and package versioning.
- Commonly used in Eclipse Equinox, Apache Felix, and other modular Java apps.
Akka Streams
- Akka Streams offers a high-level API for defining and interacting with actor-based data flows and graphs.
- Provides automatic backpressure management.
- Follows the Reactive Streams initiative; enables creation and transformation of complex streaming pipelines using a fluent DSL.